Home | Articles | Analog Film
Lightroom Film Presets: The Complete Guide to Analog Film Looks
Richard ♦ April 17, 2026 ♦ 17 min read
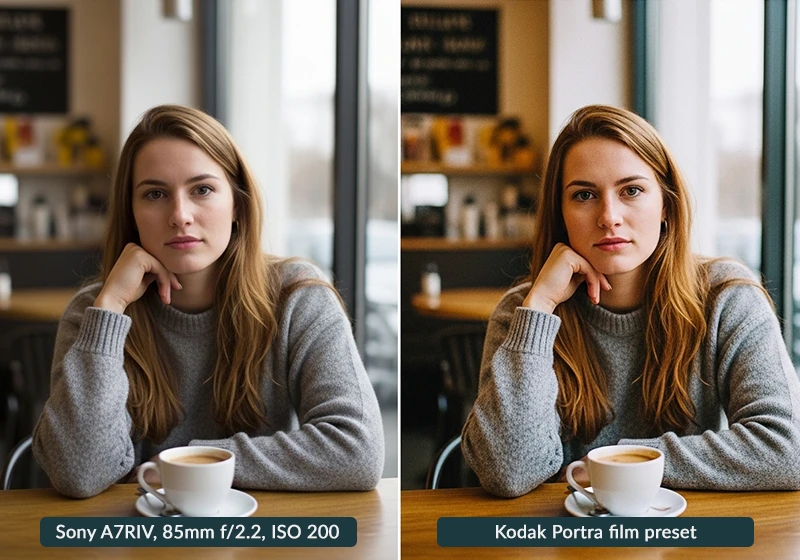
There’s something about a film photo that stops you mid-scroll. The grain, the slightly lifted shadows, the way skin tones go warm and a little unpredictable – digital cameras can’t do that out of the box. They’re too clean. Too perfect. And honestly? Sometimes perfect is boring.
That’s exactly why Lightroom film presets have taken off the way they have. At Legendary Presets, we’ve spent years reverse-engineering 30+ real film stocks from Agfa, Fuji, and Kodak, studying actual scanned negatives and slides to build presets that behave like the real thing, not just a faded filter slapped on top..
This guide covers everything: what these presets actually are, how film emulation works under the hood, which film families suit which subjects, and how to install them in under two minutes.
Whether you shoot weddings, street, travel, or just want your Instagram feed to feel less sterile, you’re in the right place.
Key Takeaways
- Lightroom film presets are
.xmpfiles that apply a set of tone, color, and grain adjustments in one click. - Film families (Agfa, Fuji, Kodak) each have distinct color science that works better for certain genres.
- Real film emulation goes beyond a “faded look” – it recreates characteristic curves, grain structure, and color response.
- Presets work on both RAW and JPEG, but RAW files give you far more control.
- You can use most presets in both Lightroom Classic and Lightroom Mobile.
01.
What Are Lightroom Film Presets?
A Lightroom preset is a saved set of editing instructions stored in an
.xmpfile (or.lrtemplatein older versions). When you click one, Lightroom applies all those settings – exposure, tone curve, HSL color shifts, grain, color grading – to your photo instantly. One click, fully adjustable afterward.
A Lightroom film preset is simply an .xmp file — a saved recipe of editing adjustments you can apply with one tap. Think of it like a recipe. The preset is the recipe; your photo is the raw ingredient. The end result depends on both.
Preset vs. Profile vs. LUT – What’s the Difference?
People mix these up constantly, so let’s be direct:
Term What It Is Where It Applies Preset A saved stack of Lightroom slider settings (.xmp) Develop module, fully editable Profile A color rendering applied before any sliders, lives in the Profile Browser Applied “underneath” your edits LUT A Look-Up Table, primarily used in video color grading Premiere Pro, DaVinci Resolve, etc. Lightroom Classic vs. Lightroom Mobile – Compatibility
- Lightroom Classic (desktop): Install
.xmppresets directly to the Presets folder. Full access to all sliders. Best for serious editing. - Lightroom Mobile (iOS/Android): Presets sync automatically via Adobe Creative Cloud once installed in Classic. Alternatively, you can import
.xmpfiles directly in the mobile app. Works great for quick edits on the go. - Lightroom Web: Preset support is limited on the web version – Classic or Mobile is the better option for film presets.
02.
How Film Emulation Works: The Science Behind the Look
Most articles stop at “it adds grain and fades the blacks.” That’s like saying a Ferrari “has an engine.” Let’s go a level deeper, because understanding this will make you a better editor.
Real film emulation goes beyond faded colors — it recreates the tone curve, grain structure, and color response of the original stock. What Makes Film Look Like Film
Real analog film doesn’t record light linearly. It records it through a characteristic curve – a sigmoid-shaped response that compresses highlights gently, holds shadows open, and handles midtones in a way digital sensors don’t. That’s why film highlights never feel “blown” the way a clipped digital highlight does. The rolloff is gradual.
Beyond that, film has:
- Silver halide grain – Unlike digital noise (which is random and ugly), film grain has a structure. It clumps, it breathes, it changes by ISO. ISO 100 film grain is fine and tight. ISO 3200 (like Kodak T-MAX 3200) is chunky and textural.
- Dye couplers – Color film uses three layers of dye (cyan, magenta, yellow) that don’t respond to colors in the same ratios. This is why Kodak Portra renders orange skin differently than Fuji Pro 400H renders it.
- Base + fog – Every film stock has a minimum density – a faint color cast in the deepest blacks, often greenish or brownish. This is the “lifted blacks” look that people try to imitate by dragging the black point up in Lightroom. The problem is, doing it manually gives you a flat gray lift across all colors. Real film base fog has a specific hue. That’s why precise HSL and color grading work is required.
How Lightroom Emulates Each of These
Film Property Lightroom Tool Used Characteristic curve Tone curve (per-channel RGB curves) Color response / dye couplers HSL panel + Color Grading Grain structure Grain panel (amount, size, roughness) Base + fog Color Grading shadows, black point, tone curve floor Cross-processing effects Calibration panel At LegendaryPresets, each preset uses all of these tools together – not just a single tone curve or a grain slider cranked up. That’s the difference between a preset that looks like film and one that just looks old.
Contrarian take: After testing dozens of “film preset packs” on the market, I’ve found that the most common shortcut is applying a flat tone curve and adding noise. That’s not film emulation – it’s a vibe filter. Real film stocks have unique per-channel color curves that require actual reference scans to build accurately. We used physical scans of developed film as our baseline.
03.
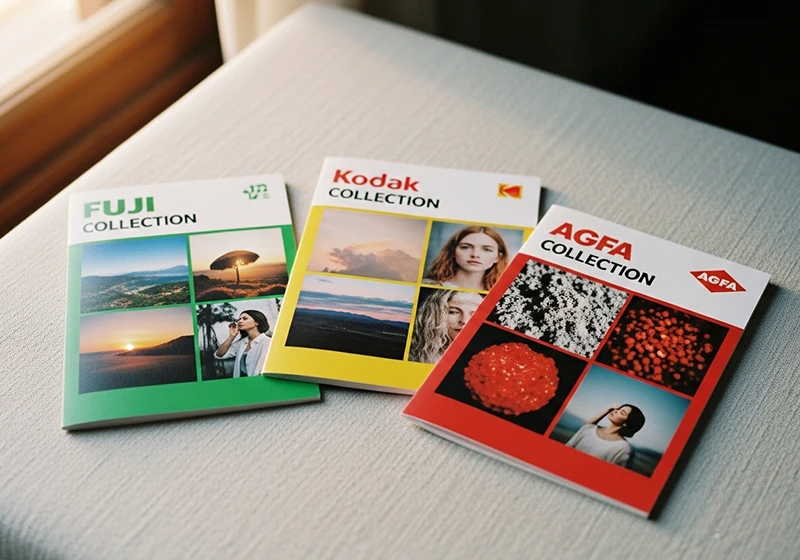
The Three Film Families: Agfa, Fuji & Kodak – What Makes Each Unique
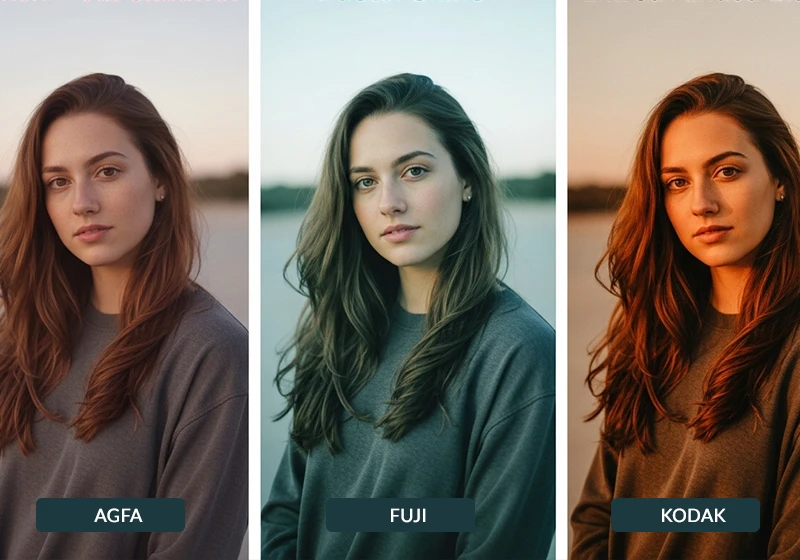
Film photography was dominated by three main manufacturers. Each had completely different color science, and that DNA carries through to how we built our presets.
Each film family has its own color DNA — punchy Agfa, precision Fuji, and warm Kodak. Same subject, three completely different moods. Agfa: Punchy, Vivid, and Criminally Underrated
Agfa stopped making consumer color film in 2005, which is partly why it has cult status now. You had to really want Agfa film – it wasn’t always on the shelf at the drugstore. The Agfa look is punchy contrast, saturated reds, and a slightly cooler, more European palette compared to the warmth of Kodak.
- Agfa Vista 400 was the ISO 400 workhorse – good in low light with a slightly coarse grain
- Agfa Precisa CT 100 was a slide film with tight saturation, especially in blues and greens
- Agfa Portrait XPS 160 was designed for skin – soft, flattering, with warm neutral tones
Browse the Agfa Preset Collection →
Fuji: The Precision Film, Beloved by Wedding Photographers
Fuji’s color science is the most technically controlled of the three families. Cool shadows, gentle pastel greens, and accurate-to-neutral skin tones – that’s the Fuji signature. Wedding photographers went crazy for Fuji Pro 400H in the 2000s and 2010s for exactly this reason: it made skin look real, not flattering in the warm-Kodak way, but honest and luminous.
Fuji also made some of the most vibrant slide films ever produced. Velvia 50/100 is famous for landscape photography – it makes greens almost fluorescent and skies absurdly saturated.
- Fujichrome Velvia 100 – hyper-saturated, ultra-sharp for landscapes
- Fujifilm Pro 400H – the wedding photographer’s go-to, cool shadows, smooth skin
- Fujifilm Natura 1600 – a rare high-ISO color film with a distinctive low-light grain structure
Browse the Fuji Preset Collection →
Kodak: America’s Film – Warm, Rich, Golden
Kodak is warmth. It’s nostalgia. The golden highlights, open shadows, and skin-flattering orange-red response of Kodak Portra have made it the most photographed film of all time. Kodak Gold 200 was the film in every disposable camera, every family vacation, every photo from the 90s that now looks impossibly warm and perfect.
The Kodachrome stocks (25 and 64) are in a different league – slide film with almost hyper-real color rendering that defined magazine photography from the 1960s through the 1990s.
- Kodak Portra 400 – the industry standard for portrait and wedding photography
- Kodak Gold 200 – that warm, slightly faded everyday look
- Kodachrome 64 – vivid, sharp, unmistakably vintage magazine aesthetic
Browse the Kodak Preset Collection →
Quick Comparison
Brand Defining Look Best For Agfa Punchy contrast, vivid reds, cool-neutral palette Editorial, fashion, street Fuji Cool shadows, pastel greens, accurate skin Weddings, portraits, travel Kodak Warm highlights, golden tones, rich skin Everyday, lifestyle, weddings 04.
The Best Film Presets by Photography Genre
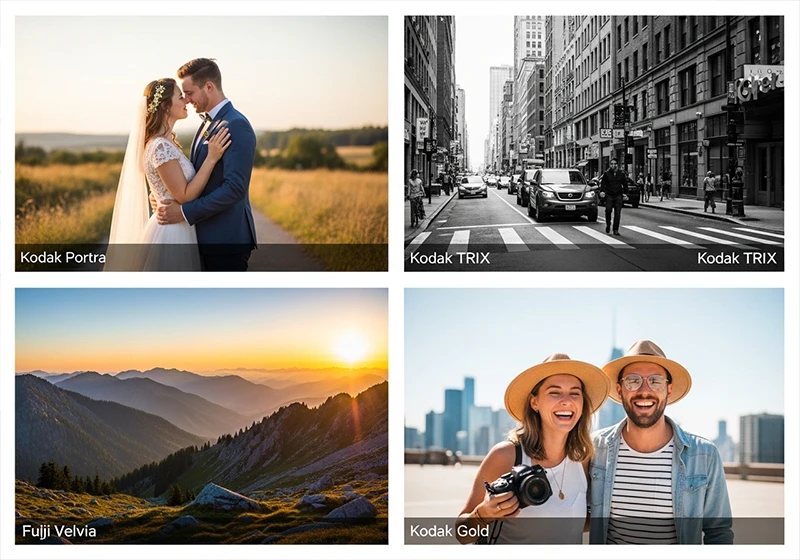
Not every film stock works for every situation. Here’s how to match the right preset to your subject.
The right film stock depends on your subject — Portra for people, TRI-X for streets, Velvia for landscapes, Gold for everyday life. Portraits & Weddings
For skin tones, you want films that were designed with human subjects in mind. Kodak Portra was literally engineered for portraiture – the name says it all. Fuji Pro 400H is its cooler, more modern counterpart.
- Kodak Portra 400 – warm, flattering, silky
- Kodak Portra 160 – finer grain, beautiful in good light
- Fujifilm Pro 400H – cooler, more neutral, great for outdoor weddings
- Agfa Portrait XPS 160 – soft and flattering with a subtle warmth
Street Photography
Street photography rewards grain, contrast, and a timeless feel. Black and white rules here.
- Kodak TRI-X 400 – the definitive street photography film, used by Henri Cartier-Bresson and countless others
- Fujifilm Neopan Acros 100 – extremely fine grain, beautiful tonal range
- Kodak T-MAX 3200 – aggressive grain, high drama for dark urban scenes
For color street photography:
- Agfa Vista 400 – punchy and gritty
- Kodak UltraMax 400 – warm and a bit rough
Travel & Landscapes
Landscapes want saturation and dimension. Slide films were made for this.
- Fujichrome Velvia 100 – the gold standard for landscape film, almost painterly saturation
- Kodak Ektachrome E100 – cleaner than Velvia, more neutral but still very vivid
- Agfa RSX II 100 – warm slide film with excellent depth
Everyday & Casual Photography
For lifestyle, social media, or just everyday shooting, you want something that feels natural but has that unmistakable film character.
- Kodak Gold 200 – timeless, warm, accessible
- Fujifilm Superia 400 – cooler and slightly desaturated, very “film” feel
- Fujifilm Instax – instant camera look, perfect for social content
Genre-to-Preset Quick Reference
Genre Top Pick Alternative Portraits Kodak Portra 400 Fujifilm Pro 400H Weddings Kodak Portra 800 Fuji Pro 160NS Street (B&W) Kodak TRI-X 400 Neopan Acros 100 Street (color) Agfa Vista 400 Kodak UltraMax 400 Landscapes Fujichrome Velvia 100 Kodak Ektachrome E100 Everyday Kodak Gold 200 Fujifilm Superia 400 05.
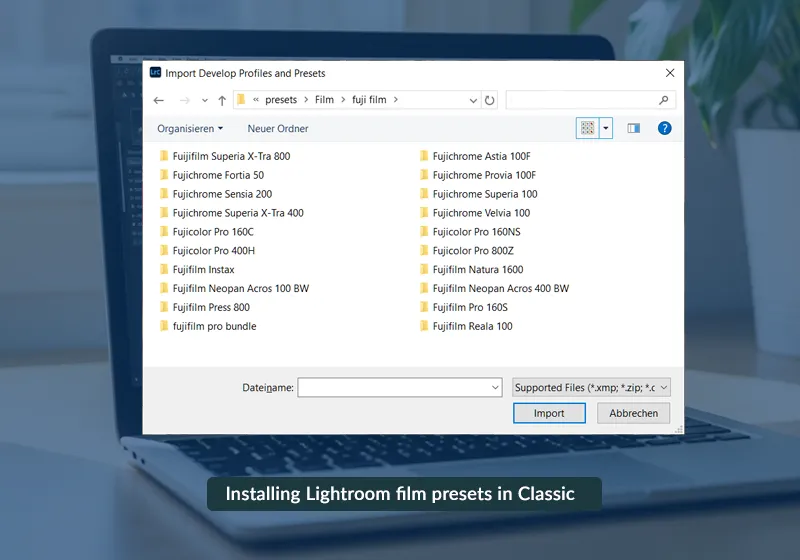
How to Install Lightroom Film Presets
Getting your presets installed takes less than two minutes. Here’s how.
Installing Lightroom film presets in Classic takes under two minutes — download, unzip, drop into the User Presets folder, restart. Lightroom Classic (Desktop)
- Download your preset
.zipfile and unzip it. - In Lightroom Classic, go to Edit > Preferences > Presets (Windows) or Lightroom > Preferences > Presets (Mac).
- Click “Show Lightroom Develop Presets” – this opens the Presets folder in Finder/Explorer.
- Copy your
.xmpfiles into the User Presets folder. - Restart Lightroom Classic. Your presets appear in the left-hand Presets panel in the Develop module.
Lightroom Mobile (iOS / Android)
Method 1 (Recommended – via Creative Cloud sync): Install presets in Lightroom Classic first. They’ll sync to Mobile automatically via Adobe Creative Cloud.
Method 2 (Direct import):
- Transfer the
.xmpfiles to your phone (email, AirDrop, Google Drive). - In Lightroom Mobile, tap the three-dot menu on any photo.
- Select “Copy settings from” – or navigate to Presets > Import Presets in the app settings.
Lightroom Web
Preset support on Lightroom Web is limited. For the best experience with film presets, use Classic or Mobile.
06.
LegendaryPresets: Our Film Preset Collections
We’ve organized the full catalog into three families so you can go as deep or as broad as you want.
LegendaryPresets covers the complete spectrum of analog film – Fuji, Kodak, and Agfa – each built from real film reference scans. Fuji Film Presets
18 individual stocks covering everything from Velvia slide film to Pro 400H professional negative film – plus the Fujifilm PRO Bundle (Pro 160C, 160S, 160NS, 400H, 800Z) if you want the whole professional line in one shot.
Kodak Film Presets
The largest family, with 20+ stocks spanning Portra, Ektar, Gold, Kodachrome, and the full UltraMax and Color Plus ranges. The Kodak Portra Collection covers six Portra variants including 400NC and 400VC.
Agfa Film Presets
Seven color stocks plus the Agfa Bundle if you want the complete set. Given that real Agfa film is discontinued, these presets are one of the only ways to work with these looks in a modern workflow.
Black & White Presets
The full B&W collection includes Agfa Scala 200X, Fuji Neopan Acros 100 and 400, and five Kodak stocks (T-MAX 100, 400, 3200, TRI-X 400, Panatomic X).
07.
FAQ: Lightroom Film Presets
Do film presets work on JPEG or only RAW?
They work on both. That said, RAW files have more data to work with – highlights that are recoverable, shadows with detail. On a JPEG, if the highlights are clipped or the blacks are crushed, the preset has less to work with. For best results, shoot RAW. If you only have JPEG, still worth trying – most presets are built with enough flexibility to work reasonably well.
Are film presets destructive to my photos?
No. Lightroom edits are completely non-destructive. Applying a preset changes the look of the image inside Lightroom, but your original file is never touched. You can reset to zero, adjust any slider, or delete the preset entirely without any permanent effect on your photo.
What’s the difference between film presets and film simulations?
Film presets are adjustments applied inside Lightroom – tone curves, HSL, grain, color grading. They’re fully editable and work on any image from any camera.
Film simulations (like Fujifilm’s built-in options – Provia, Velvia, Classic Chrome) are in-camera processing modes. They’re baked into the JPEG at the time of capture. If you shoot Fuji in Classic Chrome mode and save as RAW, the simulation is a preview only – it doesn’t alter the actual RAW data.
Do I need Lightroom Classic or will Mobile work?
Both work. Lightroom Classic is more powerful for batch editing and precise control. Lightroom Mobile is great for quick edits and on-the-go work. Presets installed in Classic sync automatically to Mobile.
How accurate are digital film emulations vs. real film?
Honestly, it depends on who built them. Generic presets just fade the blacks and add a warm tint – that’s not emulation. Accurate presets are built from actual film scans, matching the per-channel tone curves and color response of specific stocks. The presets in our collection were built against real reference scans. Are they identical to shooting actual film? No – the sensor’s dynamic range, color response, and the lens all play a role. But a well-built preset gets you 80–90% of the way there, especially in terms of the color science and tonal character that define each stock.
Learn more about analog film Lightroom presets:
- Editing Urban Night Shots for Punchy Cityscape Photos
- Realistic Film Grain Without Losing Detail in Lightroom
- Classic Kodak Color in Lightroom: Film-Style Editing Guide
- Slide-Film Aesthetic for Architecture: Lightroom Guide
- Vintage Travel Edits: From RAW to Retro Glow in Lightroom
- Lightroom Tips to Balance Bright Colors Without Clipping Highlights
Richard is a commercial and editorial photographer with over 15 years behind the lens. He’s shot on film and digital across three continents, and still keeps a Nikon F3 loaded with Kodak Portra on his desk. At LegendaryPresets, he leads preset development – studying actual film scans to make sure every stock behaves like the real thing.
- Lightroom Classic (desktop): Install