Home | Articles | Analog Film
Kodak Color Science in Lightroom: Why It Looks the Way It Does
Richard ♦ updated June 13, 2026 ♦ 15 min read

If you’ve ever wondered why Kodak photos look the way they do, that specific warmth, the way shadows never go fully black, the way skin always seems to glow without looking orange, the answer isn’t taste. It’s chemistry.
Kodak color science is a set of deliberate engineering decisions baked into the film’s emulsion. Once you understand what those decisions were, you can replicate them in Lightroom with far more accuracy than any generic “warm it up” tutorial gets you. And when a preset does the work for you, you’ll know exactly what sliders to touch when it needs adjusting on a specific image.
This guide covers why Kodak color looks the way it does, how it differs across the major stocks, Portra, Gold, Ektar, and UltraMax, and the exact Lightroom moves that map to each characteristic. It’s the article I wish had existed when I first started working with film emulation presets at Legendary Presets. Most guides tell you what to do. This one explains why.
Legendary Presets covers the complete Kodak range, browse all Kodak film presets to find the stock that fits your shooting style.
Key Takeaways
- The Kodak color look comes from specific emulsion engineering decisions, not just a warm filter
- The orange mask in color negative film is the origin of Kodak’s lifted shadows and color rendering character
- DIR couplers control sharpness and inter-layer color bleeding, understanding them explains why Kodak skin tones look “clean” rather than muddied
- Each Kodak stock expresses the same base color science differently, Portra is neutral, Gold is warm, Ektar is saturated, UltraMax is vivid
- The Lightroom moves that replicate Kodak color science are specific and learnable, tone curve black point, HSL channel adjustments, and the Calibration panel work together as a system
- Building it manually gives you control; a well-built preset saves you 20 minutes per image
01.
The Chemistry Behind the Look
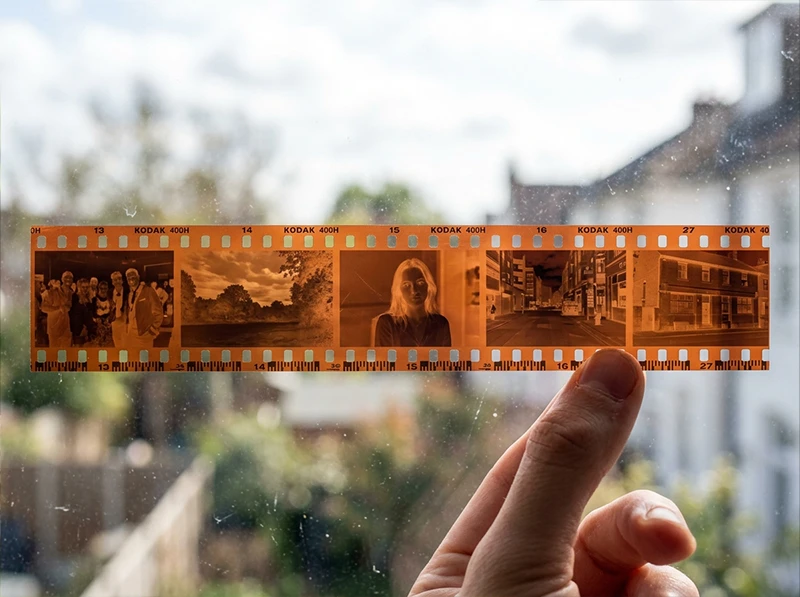
Color negative film, Portra, Gold, Ektar, UltraMax, all processed in C-41 chemistry, has three light-sensitive layers stacked on top of each other. Each layer responds to one color channel: red, green, or blue. When light hits the film, those layers record the scene as a negative. Colors inverted. Tones inverted. And the whole thing has an orange cast.

The orange base of a processed Kodak color negative, the orange mask that’s been correcting color rendering since 1949. That orange cast is called the orange mask. It exists because the cyan and magenta dye layers absorb slightly more light than they should, the mask compensates for those imperfections when the negative is printed or scanned. Kodak introduced it in 1949 specifically to improve color rendition in Kodacolor negatives.
When you scan a Kodak negative and correct for the orange mask, you’re not just removing a color cast. You’re undoing a correction layer engineered to produce specific results. The warmth that survives that process is warmth built into the emulsion’s dye formulation by design. That’s why Kodak color doesn’t look like you turned up a temperature slider. It looks like light hitting chemistry.
What the orange mask produces in a finished scan:
- Shadows that lift rather than fall to true black
- A warm color base that survives correction
- Highlight density that rolls off gradually rather than clipping hard
02.
What Makes Kodak Skin Tones Different
The second ingredient is DIR couplers, Development Inhibitor Releasing couplers. As the film develops, the dye in each color layer can bleed slightly into neighboring layers:
- Cyan bleeding into the red channel
- Magenta bleeding into the green
- That contamination is what makes some films look muddy at color boundaries

How Classic Kodak Color transforms a digital image. DIR couplers release inhibitors during development that slow the reaction in adjacent layers, reducing that bleed. The result is cleaner color separation, which is why Kodak Portra skin tones look clean rather than muddied. The reds and yellows in skin don’t get contaminated by green channel bleed from foliage in the same frame.
This is what photographers mean when they talk about Kodak “color science” rather than just Kodak “color.” It’s not one slider. It’s a system of chemical decisions working together, and understanding it tells you exactly which Lightroom panels to reach for when an emulation looks slightly off.
03.
How Each Kodak Stock Expresses the Same Science Differently
All four stocks share the same foundation, the orange mask, the layered emulsion, the DIR coupler system. What differs is how each stock tuned those variables for its intended purpose.
Stock Designed For Color Character Shadow Lift Grain Portra 400 Professional portrait, wedding Neutral-warm, accurate skin Low-moderate Very fine Gold 200 Consumer everyday, travel Warm, golden, nostalgic Moderate-high Fine, tactile Ektar 100 Commercial, landscape Vivid, high saturation, punchy Low Extremely fine UltraMax 400 Versatile consumer Vivid, broad palette, rich greens Low-moderate Moderate Portra was engineered for predictable accuracy across varied lighting:
- Warm enough to flatter skin, neutral enough to hold accurate color everywhere else
- Exceptionally smooth highlight rolloff, retains detail in bright dresses and windows
- Wide exposure latitude: overexpose by 2 stops and the highlights still hold
Gold took the same base approach but pushed it further:
- Red and orange channels boosted relative to Portra
- Higher shadow lift, blacks render as dark brown rather than true black
- Blues muted rather than vivid, giving the nostalgic golden character Gold became famous for
Ektar went the opposite direction entirely:
- Maximum saturation, minimum grain, optimized for commercial and landscape use
- On portraits, the high saturation can make skin look vivid rather than natural
- On landscapes, that same push makes every blade of grass and rock face glow
UltraMax sits between Gold and Ektar:
- Warmer than neutral, more vivid than Gold, grainier than both
- Handles mixed lighting well, delivers wide-palette color with real energy
- Better for street and documentary than for controlled portrait sessions
I’ve run all four on the same outdoor portrait set. The differences are immediate: Portra is clean and accurate, Gold is warm and glowing, Ektar makes the background pop but pushes the skin, UltraMax falls between Gold and Ektar with more grain than either.
04.
Translating Kodak Color Science into Lightroom
This is where most tutorials start and end. Here’s how to build the Kodak look from scratch in Lightroom, mapped back to the actual film characteristics, so each adjustment has a reason behind it.
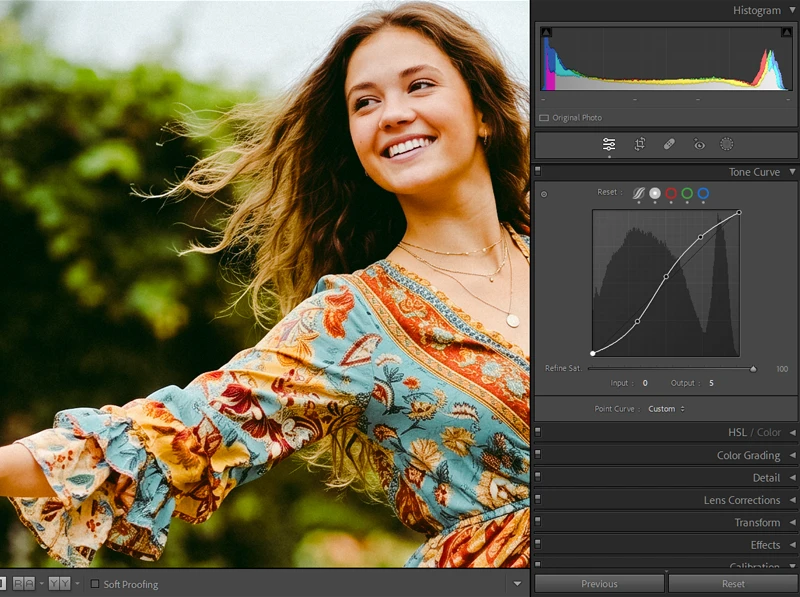
Key Lightroom settings to achieve Classic Kodak Color. 1. The Tone Curve: Black Point and Highlight Rolloff
The orange mask means Kodak color negatives never produce a true black. When you correct for it, shadows lift rather than falling to zero. In Lightroom, this translates to raising the black point.
Go to the Tone Curve panel. Grab the bottom-left anchor point of the curve and pull it up so it sits at roughly 15–20 on the Output axis. This is the most important single move in building a film emulation, it’s the difference between a digital edit and something that reads as film.
For the highlights: pull the top-right anchor point of the curve very slightly to the left, down from 255 to around 245–250. This creates the gentle highlight rolloff that Kodak stocks are known for, where bright areas lose density smoothly rather than clipping hard.
The lifted black point on the tone curve is the single most important move in film emulation. This is what the orange mask looks like as a Lightroom adjustment. 2. White Balance: The Foundation of Each Stock’s Character
For Portra, your white balance should be close to accurate, the stock is designed to render color neutrally. Add around +100–150K warmth above your camera’s neutral reading and stop there.
For Gold, push warmer, +200–350K above neutral. Gold’s warmth is structural, not subtle.
For Ektar, stay closer to neutral or slightly cool. The saturation does the work; a warm white balance can push Ektar into oversaturation quickly.
For UltraMax, similar to Gold but slightly less aggressive, around +150–200K above neutral.
3. HSL Panel: Where Each Stock’s Personality Lives
This is where you build the character differences between stocks.
For Portra:
- Reds: Saturation +5, Hue 0
- Oranges: Saturation +5, Luminance +5
- Blues: Saturation –5 to –10 (gentle muting, not aggressive)
- Greens: Hue shift slightly toward yellow (+3)
For Gold:
- Reds: Saturation +8, Luminance +8
- Oranges: Saturation +10, Luminance +10, Hue –3 (push toward red-orange)
- Blues: Saturation –15, Luminance –10 (significant muting, this is the characteristic Gold look)
- Cyans: Saturation –10
- Greens: Hue +5 toward yellow
For Ektar:
- Reds: Saturation +15
- Greens: Saturation +15, Luminance +5
- Blues: Saturation +10 (Ektar blues are vivid, not muted like Gold)
- Yellows: Saturation +10
For UltraMax:
- Reds: Saturation +10
- Greens: Saturation +12, Hue +3 toward yellow-green
- Blues: Saturation +8 (richer than Gold, less vivid than Ektar)
4. Color Calibration: The Move Nobody Talks About
The Camera Calibration panel in Lightroom controls the base response of the three color channels before any other adjustments apply. This is where you can replicate the inter-layer color relationships that DIR couplers produce in the actual film.
For any Kodak color science emulation, start here:
- Red Primary Hue: –5. This shifts the reds away from pure red toward orange, replicating the warm red-orange relationship in Kodak emulsions. On skin tones, the effect is immediately visible, skin shifts from “digitally warm” to “actually film.”
- Blue Primary Saturation: –10 to –15. De-emphasizing the blue primary reduces overall blue saturation before the HSL adjustments take effect, producing cleaner color separation rather than vivid blues competing with warm tones.
- Green Primary Hue: +3. Nudges greens toward yellow-green, matching the slightly warm-green rendering in most Kodak color negative stocks.
I added this calibration step to my preset-building workflow after spending time comparing Lightroom emulations against actual scans. The difference it makes is subtle but real, specifically on skin tones and in the transition zones between colors. Without it, the result looks like a warm filter. With it, it looks like film.
5. Grain: Building the Right Texture for Each Stock
Film grain and digital noise are structurally different. Digital noise is random and channel-specific, it looks speckled and harsh. Film grain is luminance-based, it follows the tonal density of the image, appearing finer in highlights and denser in midtones.
In Lightroom’s Effects panel:
- Amount: 20–25 for Portra 400. 20–22 for Gold 200. 28–35 for UltraMax 400. 15–18 for Ektar 100.
- Size: Keep it small, 20–25. Larger grain looks like camera noise, not film.
- Roughness: 50 for most stocks. Drop to 35–40 for Ektar, which has the finest grain of any Kodak color negative film.
Apply grain after your tone curve and color adjustments. Grain interacts with contrast, if your curve changes after the grain is set, the grain appearance shifts.
05.
When to Build It Manually vs. Use a Preset
Building the Kodak color science look manually takes 15–25 minutes per image when you’re learning it. Once you’ve built one version of each stock that works on your camera and your typical lighting conditions, you save it as a preset. From that point forward, one click gets you 80% of the way there, the remaining 20% is fine-tuning for the specific image.
The manual approach is worth doing at least once per stock. It teaches you why each slider exists and makes fine-tuning faster and more accurate. When the preset looks slightly off on a particular image, you’ll know exactly which panel to look at and what direction to push it.
The Kodak Lightroom presets at Legendary Presets are built from actual film scan analysis, tone curve, HSL, calibration, and grain all calibrated to the measured response of each physical stock. They’re a useful reference point whether you use them as-is or study them to understand how the emulation is constructed.
For specific stock deep-dives: Kodak Gold 100, 200, and 400 presets · Kodak Portra 160, 400, and 800 presets · Kodak Ektar 100 presets
06.
The Quick Reference: Kodak Color Science in Lightroom by Stock
Adjustment Portra 400 Gold 200 Ektar 100 UltraMax 400 White balance warmth +100–150K +200–350K Neutral +150–200K Black point lift 15 20 10 15 Orange HSL sat boost +5 +10 0 +8 Blue HSL sat reduction –5 to –10 –15 +10 +8 Red Primary Hue (Cal.) –5 –5 –3 –5 Grain Amount 20–25 20–22 15–18 28–35 FAQ: Kodak Color Science and Lightroom
What is Kodak color science?
Kodak color science refers to the specific engineering decisions in Kodak’s film emulsions that produce their characteristic color rendering, warm skin tones, lifted shadows, clean color separation, and a gentle highlight rolloff. It comes from the orange mask in the film base, the three-layer dye structure, and DIR couplers that control inter-layer color bleed during development.
Why do Kodak film photos look warmer than digital?
Two reasons. First, Kodak’s consumer and professional films were tuned to render warm, reds and oranges were boosted in the emulsion dye response. Second, the orange mask, when corrected during scanning, leaves residual warmth that isn’t present in a digital sensor reading at the same white balance.
Can I replicate Kodak color science in Lightroom without presets?
Yes, the tone curve black point, HSL adjustments per stock, Camera Calibration settings, and grain settings outlined above will get you there. It takes 15–25 minutes manually. A well-built preset condenses that to one click.
What’s the difference between Kodak Portra and Kodak Gold in Lightroom?
Portra is engineered for neutral accuracy, it renders skin flattering but doesn’t push warmth aggressively. Gold is tuned warmer and more nostalgic, with higher shadow lift and muted blues. In Lightroom terms: Gold needs a significantly warmer white balance, higher orange saturation, and stronger blue reduction than Portra.
Does Kodak color science work on all skin tones?
Portra and Gold both perform well across a broad range of complexions. The warm orange-red push in Gold flatters most skin tones in natural light. Ektar is less forgiving on skin because the high saturation can oversaturate reds, better suited to environmental and landscape work.
Which Kodak stock should I start with in Lightroom?
Gold 200 if you want warmth and nostalgia. Portra 400 if you want professional, neutral-to-warm portraits. Ektar 100 if your subject is landscape or commercial work. UltraMax 400 for urban, street, and documentary. The Kodak Portra guide and the Kodak Gold guide cover each in more depth.
Why do shadows look brown rather than black in Kodak film photos?
The orange mask in the film base has density across the entire negative. Even in areas of maximum exposure, which produce the lightest areas of the negative, and therefore the darkest areas of the positive image, the orange mask prevents shadows from reaching true black. That lifted shadow toe is one of the defining characteristics of color negative film from any manufacturer, but it’s especially pronounced in Kodak’s consumer stocks.
07.
The Bottom Line
Kodak color science isn’t magic. It’s chemistry, the orange mask, the layered emulsion, the DIR couplers, and those chemical decisions translate directly into specific Lightroom adjustments. Once you understand the connection, you stop guessing at sliders and start working with intention.
The quick version: lift your black point, warm your white balance to the right degree for your stock, adjust your HSL channels by stock character, shift Red Primary Hue to –5 in Calibration, and add luminance grain at the right amount for your ISO. That’s the Kodak color science look in Lightroom.
Whether you build it from scratch or start with a preset and adjust from there, the knowledge of why each move exists makes every edit faster and the results more consistent.
Related reading
- Kodak Gold Lightroom Presets: Gold 100 vs 200 vs 400, Which One Do You Actually Need?
- Guide to Kodak Portra Lightroom Presets: 160 vs 400 vs 800
- Fuji vs. Kodak Color Science in Lightroom: Key Differences
- Realistic Film Grain Without Losing Detail in Lightroom
Richard is a commercial and editorial photographer with over 15 years behind the lens. He’s shot on film and digital across three continents, and still keeps a Nikon F3 loaded with Kodak Portra on his desk. At LegendaryPresets, he leads preset development – studying actual film scans to make sure every stock behaves like the real thing.