Home | Articles | Analog Film
How to Get Fuji Film Greens in Lightroom
Richard ♦ June 16, 2026 ♦ 13 min read
Fuji film greens are distinctive because they’re built from the ground up at the emulsion level, not just boosted saturation. Velvia 100 gives you deep, almost electric greens that no other film stock matches. Provia 100F keeps greens accurate and restrained. Astia 100F softens them into a pastel that stays out of the way of skin tones. Getting any of these right in Lightroom means working differently for each one, not applying one generic HSL nudge and calling it done.
I’ve spent a lot of time matching Fuji film looks from RAW files, and the mistake most people make is treating “Fuji greens” as one thing. It’s three different things, and each one needs a different approach.
Before you touch a single slider, the Fuji Lightroom presets at Legendary Presets give you a calibrated starting point for each of these film stocks, useful if you want to see where the target is before you start building manually.
Key Takeaways
- Fuji greens are stock-specific: Velvia, Provia, and Astia each render greens differently, one approach doesn’t cover all three
- The Yellow channel is as important as Green: Fuji’s green rendering is partly built on yellow-green transitions; most tutorials skip this entirely
- Camera Calibration panel matters: The Blue Primary adjustment affects greens at the sensor level, before HSL, it’s more powerful than HSL alone
- Light conditions change the approach: Overcast and golden hour greens need different starting points than midday sun
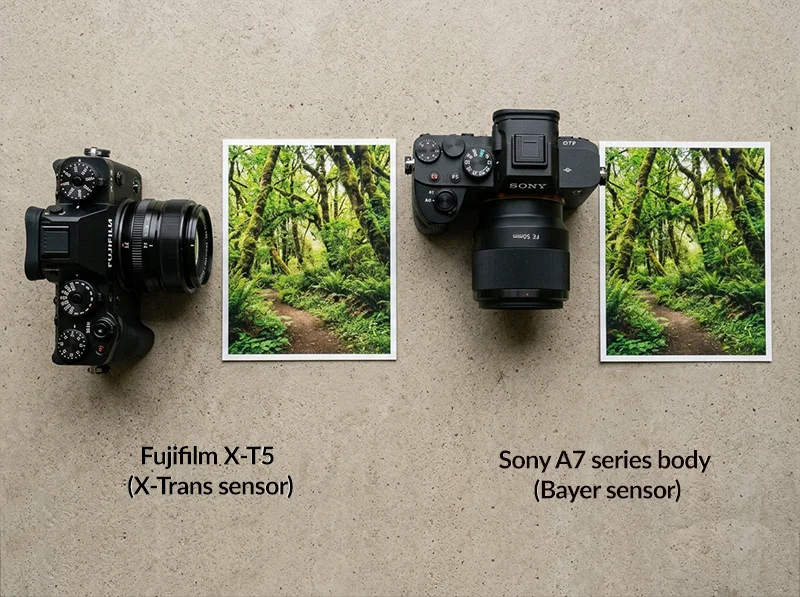
- X-Trans sensors already have a head start: Fujifilm digital camera users get closer to the film look natively, the workflow is slightly different from Bayer sensor shooters
01.
Why Fuji Greens Look Different
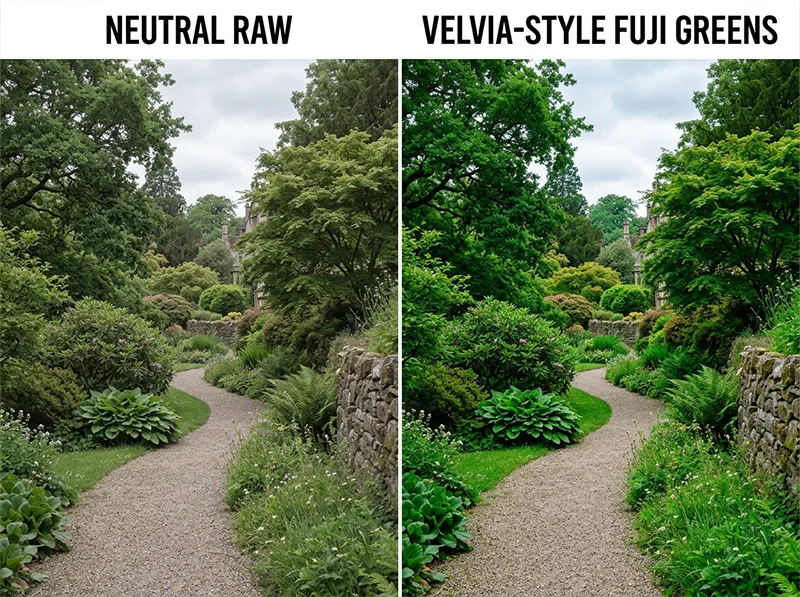
Fujifilm’s film stocks used dye-coupling chemistry that rendered greens with a specific depth and separation that digital sensors struggle to reproduce natively. The green dye layers in Velvia 100, for example, were formulated to push green saturation into territory that felt almost hyper-real, forests looked like forests at their best possible moment, not as they actually appeared on an average Tuesday.

The gap between a neutral RAW file and Velvia-style greens, this is what the HSL and Camera Calibration workflow closes What made this hard to copy digitally is that the effect wasn’t just saturation. It came from the relationship between three channels working together:
- Green: the primary channel, shifted toward a deeper, cooler tone
- Yellow: the transition zone between green and warm tones, Fuji’s emulsions kept this narrow and controlled, preventing greens from going lime or muddy
- Blue: boosted at the primary level in a way that interacted with greens to create depth in shadows under foliage
Digital cameras, particularly those with Bayer sensors (Sony, Canon, Nikon), render greens closer to neutral by default. The gap between what comes out of the camera and what Velvia would have produced is real and consistent, which is why there’s a repeatable Lightroom workflow to close it.
02.
The Three Fuji Film Greens and How They Differ
Understanding which green you’re going for is the first decision. Here’s how each film stock actually behaves:
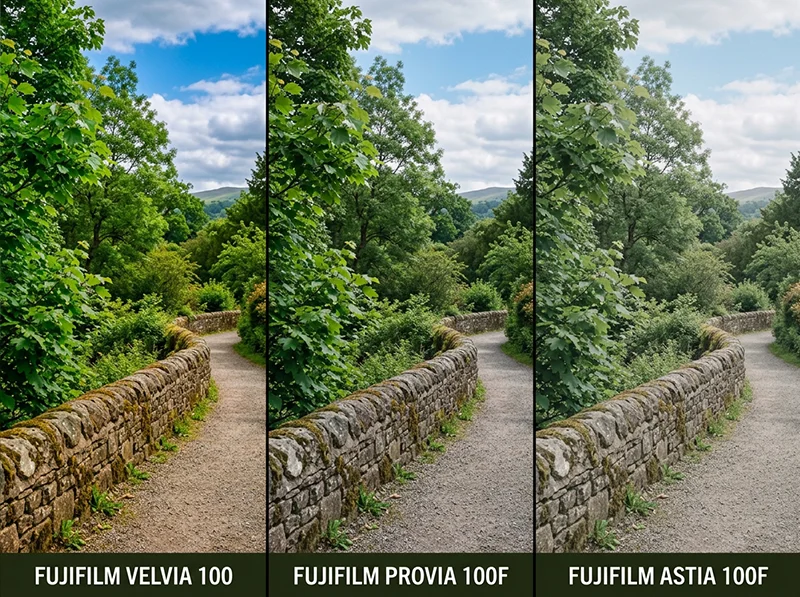
Film Stock Green Character Shadow Treatment Best For Velvia 100 Deep, saturated, almost electric Cool, dark greens in shadows Landscapes, nature, travel Provia 100F Natural, accurate, restrained Neutral, greens don’t dominate Portraits in nature, travel, general Astia 100F Soft, muted, pastel Lifted, open, greens recede Portraits, fashion, soft outdoor scenes Three Fuji film stocks, three completely different green characters, Velvia (left) is deep and saturated, Provia (center) is accurate and restrained, Astia (right) is soft and pastel Velvia 100 is the one people picture when they say “Fuji greens.” The saturation is aggressive by design, Fujifilm built this film for landscape and nature photographers who wanted colors to sing. In Lightroom, you’re pushing hard in multiple panels to get here.
Provia 100F is the opposite instinct. Greens are accurate rather than enhanced, the goal is to make them look exactly right, not more vibrant than real life. The Lightroom approach is mostly about restraint and preventing the lime-green cast that digital sensors introduce.
Astia 100F is a portrait film that happens to render greens beautifully in a completely different way. Greens are muted, soft, and slightly warm, they don’t compete with skin tones. In Lightroom, you’re deliberately pulling back from saturation while keeping a warm undertone in the greens.
Explore our full collection of film presets and find the perfect analog look for your photography style.
03.
03. The Lightroom Workflow – Panel by Panel
White Balance first
Fuji film stocks in daylight all sit slightly cooler than standard daylight (5,500K). As a starting point:
- Pull Temp to around 5,100–5,300K from your camera’s auto reading
- Add +5 to +8 Tint toward green to pull away from magenta
This green Tint push is often the most overlooked step, it affects how greens render across the entire image before you touch anything else.
The HSL panel with Yellow Hue pulled toward green and Green Saturation pushed, the two moves that close most of the gap between a digital RAW file and Fuji film greens The HSL panel, the critical moves
This is where most of the work happens. Here are the specific settings per film stock:
Velvia 100, deep, saturated greens:
Channel Hue Saturation Luminance Yellow -5 to -8 +5 to +10 -5 Green -8 to -12 +20 to +30 -10 to -15 Aqua 0 +5 to +10 -5 Blue +5 to +8 +15 to +20 -5 to -10 The Green Hue shift toward teal (negative values) is what gives Velvia greens their depth, it prevents the lime-yellow cast that digital sensors default to. The Green Luminance drop darkens the greens slightly, creating that rich, almost brooding quality in forest shots.
Provia 100F, natural, accurate greens:
Channel Hue Saturation Luminance Yellow -3 to -5 0 to +5 0 Green -5 to -8 -5 to +5 0 to +5 Aqua 0 -5 0 Blue +3 to +5 +8 to +12 0 Provia is about restraint. Small moves across the board. The key difference from Velvia is that Green Saturation barely moves, you’re correcting the digital cast, not amplifying the greens. Green Luminance stays neutral or slightly lifted to keep the image open.
Astia 100F, soft, pastel greens:
Channel Hue Saturation Luminance Yellow +3 to +5 -5 to -10 +5 Green +5 to +8 -10 to -20 +10 to +15 Aqua 0 -8 to -12 +5 Blue 0 to +3 0 to +5 +5 Astia moves in the opposite direction. Green Hue shifts toward yellow-warm (positive values), Saturation drops, and Luminance rises, greens become lighter, warmer, and softer. This is what lets skin tones read clearly in outdoor portrait settings without green foliage competing for attention.
The Yellow channel – the move most tutorials miss
Fuji’s green rendering isn’t just about the Green channel. The Yellow channel controls the transition zone between warm tones and greens, and it’s where most digital green emulations go wrong.
On Bayer sensor cameras, greens and yellows blend together in a way that produces a lime-yellow cast in foliage, especially noticeable in summer grass and sunlit leaves. Fuji’s emulsions kept this zone narrow and controlled.
The fix: pull Yellow Hue toward green (negative values, -5 to -10) and reduce Yellow Saturation slightly (-5 to -10). This separates greens from yellows, removing the lime cast and giving foliage a cleaner, deeper tone. On Velvia emulations, this single move often makes a bigger difference than any Green channel adjustment.
Camera Calibration panel – ground-level adjustment
This panel is underused for film emulation, but for Fuji greens it’s one of the most important steps. The adjustments here affect how your camera’s RAW data is interpreted before any other panel runs, so changes here propagate through everything else.
For all three Fuji film stocks:
- Blue Primary Hue: shift +10 to +20 (pushes blue toward cyan, which deepens the interaction between the blue and green channels, creates the shadow depth under foliage that’s characteristic of Fuji film)
- Blue Primary Saturation: +10 to +20 (strengthens the cyan-blue in shadows, reinforcing the teal quality in darker greens)
- Green Primary Hue: shift -3 to -5 for Velvia; 0 for Provia; +3 to +5 for Astia
For Velvia specifically, also increase Green Primary Saturation by +8 to +12. This is the step that takes a good green emulation to a convincing one, it boosts greens at the sensor level rather than after tone mapping, which produces a more organic result.
Tone Curve
The tone curve affects how greens read in different parts of the image:
- Velvia: Moderate S-curve with a slightly pulled-down midtone, deepens the shadows under foliage and adds contrast to the greens without clipping highlights
- Provia: Gentle S-curve, nearly flat, Provia’s contrast was balanced, not pushed
- Astia: Lift the black point slightly (output 10–15 on the bottom-left anchor) and pull the highlights down gently, creates the soft, airy quality Astia is known for
04.
Shooting Conditions Change the Approach
The same Lightroom settings won’t produce consistent results across different lighting conditions. Fuji film stocks responded differently to different light, and so does this workflow.
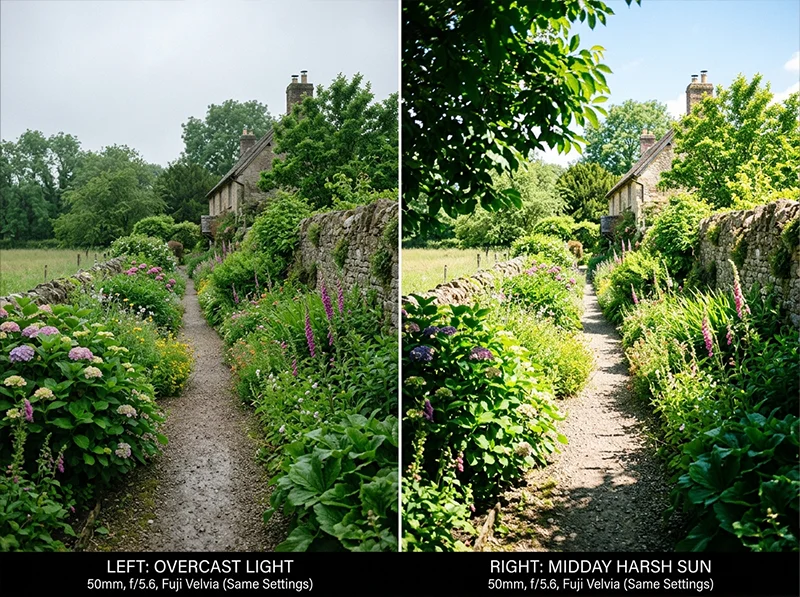
The same Lightroom settings produce very different results depending on the light, overcast (left) is forgiving; midday sun (right) needs a reduced saturation starting point Overcast light is the easiest condition for Fuji green emulation. Diffused light keeps highlights under control and lets the green channels do their work without fighting blown sky or harsh shadows. This is where Velvia’s deep greens look most natural, overexpose slightly and the saturation stays rich without going neon.
Golden hour adds warmth that competes with the cooler Fuji green palette. In this condition:
- Reduce the Tint push toward green by half (just +3 to +4 instead of +5 to +8)
- Pull back Green Saturation by 5 points from the values above
- Let the warm highlight tone stay, don’t fight it with cool adjustments; Fuji film in golden hour had a warm-cool split that’s part of its character
Midday direct sun is the hardest condition. Highlights clip easily, and greens can go oversaturated before you’ve done anything. Use a -1 stop exposure adjustment before touching HSL, and reduce Green Saturation targets by 8–10 points across the board. A polarizing filter at the shooting stage makes this significantly easier, it cuts the glare on leaves that Lightroom can’t easily recover.
Deep shade introduces a blue-green cast that needs correcting first. Pull Temp slightly warm (+100 to +200 from auto) before any HSL work, otherwise the green adjustments will amplify the existing cast rather than correct it.
05.
05. X-Trans Sensors vs. Bayer Sensors
If you’re shooting a Fujifilm X-series camera, X-T5, X-S20, X100VI, your RAW files already render greens closer to the Fuji film character than Sony, Canon, or Nikon. The X-Trans sensor’s colour filter array is designed around Fujifilm’s film color science.
X-Trans sensors (left) start closer to Fuji’s film color science natively, Bayer sensors (right) need the full HSL and Camera Calibration workflow to close the gap In practice this means:
- The Camera Calibration adjustments above can be reduced by roughly half, you’re correcting a smaller gap
- Green Saturation targets in HSL are about 5–8 points lower than the Velvia values listed above
- The Yellow channel correction is less aggressive, X-Trans handles the yellow-green transition better natively
For Bayer sensor shooters, the full values above apply. The gap between what a Sony A7 renders and what Velvia 100 produced on film is real and requires all of these panels working together to close.
06.
06. Speed Up With Presets
If you’d rather shoot than spend an hour in the HSL panel, the Fujichrome Velvia 100 presets at Legendary Presets have the Camera Calibration, HSL, and tone curve moves from this article already calibrated, including separate adjustments for Canon, Sony, and Nikon RAW profiles, which matters because the Blue Primary starting point varies enough between camera brands to need its own baseline.
The Fujichrome Provia 100F presets cover the restrained, accurate green character, and the Fujichrome Astia 100F presets handle the soft, portrait-friendly palette.
Use a preset as the starting point, then use the HSL values above to fine-tune for your specific shot and lighting condition.
07.
Frequently Asked Questions
Why do my Fuji-style greens look lime yellow instead of deep green?
The Yellow channel. Most tutorials focus on the Green channel only, but the yellow-green transition zone is where digital cameras introduce the lime cast. Pull Yellow Hue toward green (-5 to -10) and reduce Yellow Saturation slightly. That single fix removes most of the lime cast before you touch the Green channel.
Does the Camera Calibration panel matter for Fuji greens?
Yes, and it’s often more effective than HSL alone. The Camera Calibration panel runs before tone mapping, so Blue Primary and Green Primary adjustments affect the raw color data before Lightroom applies any other panel. The Blue Primary Hue shift toward cyan (+10 to +20) is what creates the depth in shadowed greens that distinguishes Fuji film from a simple saturation boost.
Why does Velvia look different from Provia in Lightroom even with the same HSL settings?
Because they’re different films with different saturation targets and different contrast curves. Velvia was built for maximum color density, it’s intentionally more saturated than accurate. Provia was built for color accuracy. The same Green Saturation boost that looks right for Velvia will look overdone for Provia. Each needs its own set of values.
My greens look good in daylight but too saturated in shade, why?
Shaded areas already have a blue-green cast from skylight. Adding Fuji-style green adjustments on top of that cast amplifies it. Correct the white balance first, pull Temp slightly warm in shaded scenes before touching HSL.
Do these adjustments work on JPEG files?
Partially. The Camera Calibration panel has no effect on JPEGs, it only works on RAW files. The HSL and tone curve adjustments work on JPEGs but with less range and more risk of banding. For the best results, shoot RAW.
Which Fuji film stock has the most distinctive greens?
Velvia 100 by a distance. Its green saturation was engineered to be more intense than any other color negative or slide film in Fujifilm’s lineup. If someone shows you a landscape photograph and says “that’s the Fuji look,” they almost certainly mean Velvia.
Related Articles
Guide to Iconic Fuji Film Looks: Provia, Velvia & Beyond The natural next read. Covers what makes each Fuji film stock visually distinctive, color palette, contrast, grain character, across the full lineup. Use it alongside this article to understand the look you’re building toward before opening Lightroom.
Fuji vs. Kodak Color Science in Lightroom: Key Differences Directly relevant if the Velvia vs. Provia comparison in this article sent you down the color science rabbit hole. Explains why Fuji and Kodak render greens, reds, and skin tones differently at the emulsion level, and what that means for your Lightroom workflow.
How to Recreate Fuji Velvia-Style Fast: Travel Photography Velvia-specific and focused on speed, useful if you want the deep green landscape look from this article but in a faster, travel-oriented workflow rather than a panel-by-panel build.
From RAW to Retro: Fuji Lightroom Editing Covers the broader Fuji editing workflow from RAW import through to final output. A good companion read for anyone who wants to extend the HSL and Camera Calibration work from this article into a full Fuji-style edit.
Realistic Film Grain Without Losing Detail in Lightroom Once you’ve matched the Fuji green color character, grain is the next step. This article covers the specific Lightroom grain settings that produce an organic film texture rather than digital noise, directly applicable to any of the three film stocks covered here.
Richard is a commercial and editorial photographer with over 15 years behind the lens. He’s shot on film and digital across three continents, and still keeps a Nikon F3 loaded with Kodak Portra on his desk. At LegendaryPresets, he leads preset development – studying actual film scans to make sure every stock behaves like the real thing.