


Home | Articles | Analog Film
The Fuji 400H Preset That Makes Your Portraits Look Like Film
Richard ♦ May 11, 2026 ♦ 18 min read

If you’ve been chasing that soft, pastel-toned film look for your portraits or wedding work, the fuji 400h preset is probably already on your radar. And for good reason.
The Fuji PRO 400H preset for Lightroom inside Legendary Presets delivers one of the most requested film looks in photography today: lifted shadows, gentle skin tones, and a warmth-meets-cool balance that’s genuinely hard to fake from scratch.
This guide breaks down exactly what this preset does, how to get the most out of it, and why it’s become a go-to for portrait and wedding photographers worldwide.
01.
Background
What Made Fujifilm Pro 400H So Special?
Fujifilm Pro 400H was a medium-format color negative film, ISO 400, built for portrait and wedding work. From the early 2000s right up to its discontinuation in 2021, it was the film of choice for photographers shooting on Pentax 645, Mamiya RB67, and Hasselblad systems.

It was designed to be overexposed – many photographers shot it at box speed but pushed exposure by 2/3 to 1 full stop – and it rewarded that approach with the most beautiful, creamy highlight rolloff you’d ever seen on skin.
What made 400H different from something like Kodak Portra 400 came down to three things: its muted, slightly blue-green shadow rendering, a greenish-pink cast in midtones that somehow made skin look incredibly soft, and a gentle desaturation in foliage that kept backgrounds from competing with subjects. It wasn’t a punchy, saturated film. It was quiet, romantic, and deeply flattering.
Fujifilm pulled the film from production in 2021, citing manufacturing challenges. That decision sent a wave of photographers to the used market and, eventually, to Lightroom – searching for a digital equivalent that could honor what 400H did on a roll of 120.
Pro 400H is a portrait staple, but Fuji has a lot more to offer. The Fujifilm Lightroom presets overview shows you the full range, from slide films to consumer stocks.
COLOR THAT OUTLIVES TRENDS
Moody fades. HDR burns out. Fuji 400H has looked good since 2004 and will look good in 2034. Buy once. Look timeless. Ignore the algorithm.
02.
Analysis
What a Fuji 400H Preset Actually Does in Lightroom
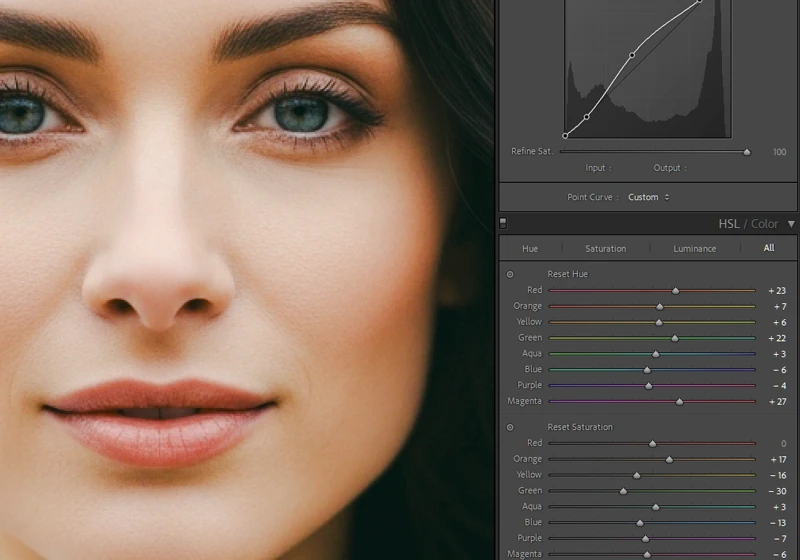
This is the section most articles skip. They show you pretty before/afters but never explain the mechanics. Here’s what’s actually happening under the hood when you apply a well-built fuji pro 400h preset:
RAW Profile: A good preset starts from Adobe Standard rather than a Fujifilm-specific profile. Adobe Standard gives a flatter, more neutral base that lets all the subsequent adjustments land consistently – regardless of which camera body you’re shooting with.
White Balance and Tint: The tint slider (the green-to-magenta axis) is the single most defining adjustment in any 400H simulation. Real 400H had a slight green-pink push in midtones. A properly tuned preset shifts the tint toward magenta just enough to bring that warmth into skin without going full pink.
Tone Curve: Expect a gentle S-curve with lifted blacks. This is what gives film its “milky” shadow quality. Deep blacks get pushed up – a classic negative film characteristic – while highlights roll off softly instead of clipping hard.
HSL Adjustments: Greens get desaturated and shifted toward yellow-green rather than vivid emerald. Reds shift slightly toward orange, then back toward pink in the hue channel. Aquas are often warmed slightly to keep outdoor skies from going too cold.
Shadow Lift: The overall shadow luminance is raised. This reduces contrast across the board and is a large part of why 400H feels so “airy.”
Grain: Fine-grain structure at low opacity. Not heavy. Just enough to remove the sterile digital feel.
Legendary Presets covers the complete Fujifilm range, browse all Fuji film presets to find the stock that fits your shooting style.
03.
Comparsion
3. Fuji 400H vs. Kodak Portra 400 – Which One Works Better for Weddings?
This is a question I get all the time, and the honest answer is: it depends on the light. Here’s a direct comparison:
| Feature | Fuji Pro 400H | Kodak Portra 400 |
| Skin tone rendering | Soft pink-green, pastel | Warm orange-amber, richer |
| Shadow behavior | Lifted, almost washed-out | Slightly deeper, more contrast |
| Green/foliage handling | Muted, cool, desaturated | Warmer, more yellow-green |

Here’s my take after years of testing both: I stopped defaulting to Portra 400 for outdoor weddings. The reason is specific. When you’re shooting a ceremony or portraits in dappled shade – broken light filtering through trees – the 400H preset handles the mixture of warm highlights and cool shadows far more naturally.
Portra tends to go a bit orange in those mixed-light situations. The 400H tint keeps skin tones even without requiring manual HSL fixes on every frame.
For indoor receptions with warm tungsten or candlelight, Portra wins. But for outdoor portraits in open shade or soft diffused light, 400H is the more flattering choice. This is especially true for lighter skin tones and bridal gowns, where the soft shadow lift on 400H keeps white fabric from going gray.
If you specifically need that cooler Fuji rendering, your best bet now is pushing Fujifilm C200 to 400. It won’t match Pro 400H exactly (the grain structure is different and colors shift when pushed), but it’s the closest alternative from Fuji’s current lineup. The Fujicolor C200 Lightroom Preset – Warm Vintage Look can help bridge that gap in post-processing when you need more control over the final color palette.
The film photography aesthetic has never been more in demand, explore our analog Lightroom presets collection and see how each stock handles your light differently.
04.
How to
How to Apply and Tune the Fuji PRO 400H Preset in Lightroom
Follow these steps in order. Skipping steps – especially the exposure adjustment before applying – is the most common reason people feel the preset “doesn’t look right.”

Step 1: Shoot in RAW. There’s no workaround. JPEG files have already had contrast, sharpening, and color rendering baked in by the camera. A preset applied to a JPEG is trying to re-edit a photo that’s already been processed. You lose too much to work with.
Step 2: Adjust exposure before applying the preset. If your RAW is correctly exposed at zero, nudge it to +0.3 or +0.5. Real 400H was almost always shot slightly overexposed. Starting from a slightly bright RAW gives the preset the highlight headroom it was built to work with.
Step 3: Apply the preset as your starting point. Don’t expect it to be the final edit. It’s a baseline, not a one-click finish.
Step 4: Fine-tune white balance. Temperature and tint are the two most sensitive sliders. Move temperature first, then tint. Most outdoor portraits will need a small tint adjustment toward magenta (+5 to +10) to dial in the skin tones for your specific light conditions.
Step 5: Check skin tones in HSL. If skin reads too pink, bump the Red Hue slider slightly toward orange. If it reads too flat, nudge Red Saturation up by 5–8 points.
Step 6: Lift blacks if you want a more expired-film feel. Pull the Blacks slider up by 10–15. This increases the “milky” shadow quality and gives a more washed-out, vintage result.
Step 7: Add grain last. If the preset doesn’t include grain, go to Effects and set Amount to 15–20, Size to 25, Roughness to 50. Subtle. Not Instagram-filter heavy.
Compatibility note: This workflow works in both Lightroom Classic and Lightroom CC (desktop). The preset also applies correctly to RAW files from Sony, Canon, Nikon, and Lumix bodies – not just Fujifilm cameras. The film simulation is in the Lightroom adjustments, not the camera profile.
05.
In Praxis
The Best Shooting Scenarios for the Fuji 400H Preset
Not every situation calls for 400H. Here’s where it earns its place – and where you should reach for something else.

Where 400H shines:
Outdoor weddings in open shade are the ideal use case. The way the preset handles soft, directionless light is almost uncanny – it feels like you actually shot the day on film. Golden hour portrait sessions also respond beautifully, especially when you’re 30–45 minutes before sunset and the light has that warm, low-contrast glow.
Lifestyle family sessions in bright, airy interiors with large windows are another strong match. And for boudoir work, the lifted shadows are genuinely forgiving – they soften skin texture without the artificial look of heavy skin-smoothing edits.
Where it struggles:
Harsh midday sun with heavy contrast is a poor match. The shadow lift that makes 400H so flattering in soft light becomes a problem when the contrast range is already extreme – you end up with flat, low-contrast images that look underexposed. In those conditions, Kodak Ektar 100 or Kodak Portra 160 presets give a more satisfying result.
For photographers ready to explore modern interpretations of classic Fuji aesthetics, the Fujifilm Film Simulation Presets collection offers multiple options beyond just Pro 400H. These presets capture different looks from Fuji’s film and digital simulation catalog, giving you flexibility to match your subject and lighting without being locked into one specific look.
From a recent shoot: I had an outdoor wedding in last May – ceremony at 4pm, portraits immediately after in a grove of oak trees. Late afternoon, lots of broken shade and warm sidelight. I applied the 400H preset across 180 portrait frames.
Of those, I made individual white balance adjustments on fewer than 20. That’s the real-world efficiency argument for a well-built preset: it should work on the majority of your frames with minimal tweaking.
06.
Film Simulation
Fuji Film Simulation in Lightroom vs. In-Camera Film Simulation
A lot of Fujifilm shooters get confused about this, so it’s worth being direct. The film simulations built into Fujifilm cameras – PROVIA/Standard, ASTIA/Soft, Classic Chrome, VELVIA/Vivid – are not the same as a Fuji Pro 400H simulation in Lightroom.
Here’s the key difference: in-camera film simulations are applied at the JPEG rendering stage. They’re baked into the file. If you shoot JPEG with Classic Chrome, that’s the starting point for every edit – you can’t remove it or adjust how it was applied. You’re working with the result, not the raw material.
Lightroom presets work on the RAW data, before any color rendering has happened. That means you get full control over how the simulation interacts with your specific exposure, light source, and scene. You can push or pull any slider without fighting against a pre-baked look.
Fujifilm Pro 400H was also a different category of material entirely. ASTIA, PROVIA, and VELVIA are slide films – high contrast, saturated, with deep blacks. Pro 400H was a color negative film – lower contrast, higher latitude, with a very different tonal response. No in-camera Fujifilm simulation replicates it. The closest in-camera option is ASTIA/Soft, but even that lands quite far from 400H’s actual character.
Related camera systems: Fujifilm X-T5, Fujifilm X100VI, Fujifilm GFX 100S, Sony A7 series, Canon R-series.
07.
Key Takeaways
- Shoot RAW. A fuji 400h preset applied to a JPEG produces inconsistent, often muddy results. RAW is not optional if you want the preset to work as intended.
- Overexpose slightly before applying. +0.3 to +0.5 exposure before applying the preset matches how photographers actually shot the original film stock.
- The tint slider is everything. The green-magenta axis is the biggest single factor in getting 400H skin tones right. Spend more time here than anywhere else.
- Works on any camera brand. You don’t need a Fujifilm body. The preset processes the RAW data regardless of manufacturer.
- 400H outperforms Portra in dappled shade. For outdoor portraits in mixed, broken light, 400H handles the tonal transitions more gracefully.
- The film is gone but the look isn’t. Fujifilm discontinued Pro 400H in 2021. A well-built Lightroom preset is now the most practical, consistent way to maintain that aesthetic in professional work.
- Adjust per scene, not per photo. Apply the preset at the batch level for a shoot, then do white balance corrections in sync. You’ll process 200 wedding images in a fraction of the time.
THE PRESET THAT BOOKS BRIDES
Presets fake film. This is film – digitized. Real grain structure. Real color response. Real chemistry, now in your Lightroom. Authenticity, automated.
08.
FAQ About Fuji Pro 400H Presets
What is the Fuji 400H preset in Lightroom?
It’s a Lightroom preset that replicates the color and tonal characteristics of Fujifilm Pro 400H film stock. It applies adjustments to the tone curve, white balance, HSL channels, and shadow lift to produce soft skin tones, muted greens, and the gentle contrast typical of color negative film.
Can I use a Fuji 400H preset on a non-Fujifilm camera?
Yes. The preset works on RAW files from any camera brand – Sony, Canon, Nikon, Lumix, and others. The film simulation is built into the Lightroom adjustments, not the camera’s color profile. You may need minor white balance tweaks depending on your camera’s color science, but the core look translates well.
Is Fujifilm Pro 400H still being made?
No. Fujifilm discontinued Pro 400H in 2021. The film is no longer in production. Used stock still circulates but is increasingly difficult and expensive to find. A Lightroom preset is now the most accessible and consistent way to work with the 400H look.
Does the preset work on JPEGs?
It can be applied to JPEGs, but the results are less predictable. JPEG files have already been processed by the camera – contrast, sharpening, and color rendering are baked in. The preset has less raw data to work with, and the tonal adjustments often land differently than intended. RAW is strongly recommended.
What’s the difference between Fuji Pro 400H and Kodak Portra 400?
Both are ISO 400 color negative films, but they render color very differently. Portra 400 produces warm, orange-amber skin tones with slightly deeper shadows. Pro 400H produces cooler, softer skin with a green-pink cast in midtones and more lifted shadows. For outdoor portraits and weddings in soft light, 400H tends to be more flattering. For indoor, tungsten-lit, or high-contrast scenes, Portra often performs better.
What does “lifting the blacks” mean when editing with a 400H preset?
Lifting the blacks means raising the Blacks slider in Lightroom’s Basic panel above zero. This pulls the darkest tones in the image away from true black, creating the “milky” or slightly faded shadow quality associated with color negative film. It reduces overall contrast and is a key part of getting an authentic film feel. A value of +10 to +20 is typical for a 400H-style result.
Can I use the Fuji 400H preset for black and white photography?
The 400H preset is a color film simulation and isn’t designed for black and white work. If you want a film-based monochrome look, Fujifilm’s Neopan Acros 100 preset or Kodak T-MAX 400 preset are better choices for that aesthetic.
What Lightroom version do I need?
The preset works in Lightroom Classic and Lightroom CC (desktop version), as well as recent versions of Adobe Camera Raw. Older versions of Lightroom (pre-2018) use a different preset format (.lrtemplate rather than .xmp), so verify the format before purchasing any preset pack.
Learn more about analog Lightroom Presets:
- Fujifilm Lightroom Presets – Every Film Simulation You Need to Know
- Fujifilm Film Simulation Lightroom: Which One Should You Use
- Fujicolor C200 Lightroom Preset: How to Get That Warm Vintage Film Look
- Kodak Film Lightroom Presets – The Full Collection Guide
- Lightroom Film Presets: The Complete Guide to Analog Film Looks
Richard is a commercial and editorial photographer with over 15 years behind the lens. He’s shot on film and digital across three continents, and still keeps a Nikon F3 loaded with Kodak Portra on his desk. At LegendaryPresets, he leads preset development – studying actual film scans to make sure every stock behaves like the real thing.