


Home | Articles | Adobe Lightroom
Using Lightroom and Photoshop Together: How It Works
Richard ♦ updated July 14, 2026 ♦ 10 min read

Right-click a photo in Lightroom, choose Edit In, and Photoshop opens a copy of it. Save that copy, and it lands back in Lightroom next to your original. That’s the whole mechanism, but the details of how it actually behaves are where most workflows break down.
This guide covers the exact steps, the dialog choices that trip people up, and how the handoff differs between Lightroom and Lightroom Classic. For the bigger-picture decision on which app to use at all, see Lightroom vs Photoshop: Which One Do You Actually Need?
Key Takeaways
- Edit In creates a new file, always, even on your first round trip
- Lightroom Classic lets you choose the file format and color space; cloud Lightroom does not
- Every extra round trip adds another file: “-Edit.tif,” then “-Edit-Edit.tif,” and so on
- RAW files skip the dialog box entirely; JPEGs and TIFFs show three options that matter
- Choose “Edit Original” to get back into a layered Photoshop file, not a flattened copy
- Selecting multiple photos and choosing “Open as Layers” builds one composite file automatically
01.
What You’ll Need
Before you start, make sure you have the following ready, since skipping any of these is the most common source of confusion later in this guide.
- Lightroom or Lightroom Classic, plus Photoshop, both installed and signed into the same Adobe account
- A photo you’ve already applied basic adjustments to in Lightroom’s Develop module
- 5 to 10 minutes for a single round trip, longer if you’re compositing multiple images
- Roughly 150 to 300MB of free space per round trip if you’re on Lightroom Classic saving TIFFs locally
- A preset applied and finalized before you start, since color decisions belong in Lightroom, not Photoshop
We build our film-emulation presets at Legendary Presets to be applied at this exact stage, before the file ever touches Photoshop, since baking the look in first saves you from redoing color work twice later in the process.
02.
Using Lightroom and Photoshop Together, Step by Step
Step 1: Finish Your Global Edits in Lightroom First
Apply your preset, adjust exposure and color, and get the photo as close to final as Lightroom’s tools allow before you touch Photoshop.
Anything you can do in Lightroom (masking, color grading, noise reduction) is faster and fully non-destructive there. Save Photoshop for the one thing Lightroom genuinely can’t do to this specific image: a composite, heavy retouching, or a design element.
Watch out: Don’t send a photo to Photoshop before finishing color work in Lightroom. Once you’re in Photoshop, you lose Lightroom’s sliders entirely for that copy.
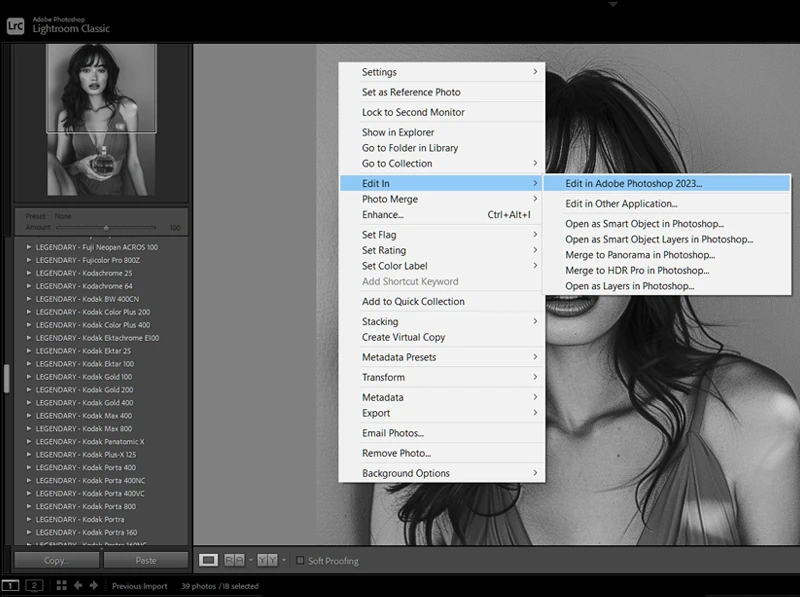
Step 2: Send the Photo to Photoshop With Edit In
Right-click the photo and choose Edit In, then Edit in Adobe Photoshop.
- If it’s a RAW file: it passes straight to Photoshop. No dialog box appears.
- If it’s a JPEG, TIFF, or PSD: a dialog box appears with three choices that genuinely matter.
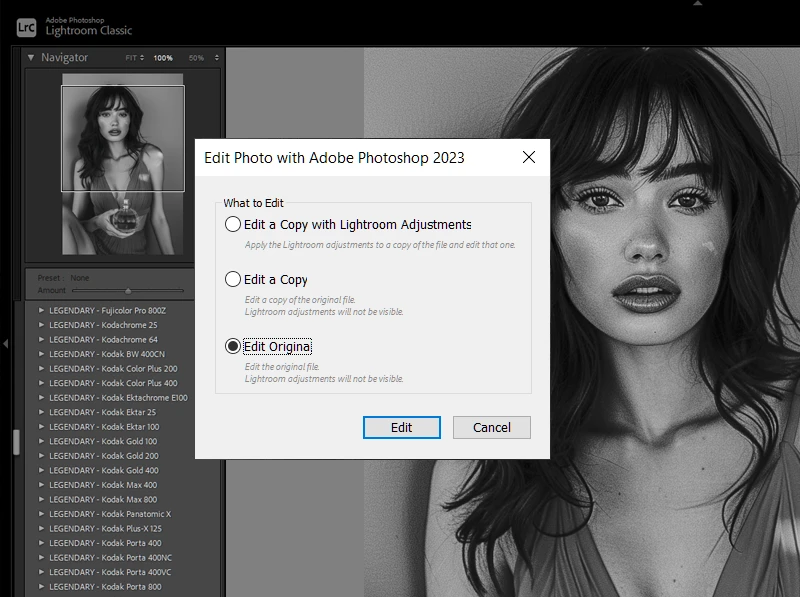
Step 3: Choose the Right Dialog Option
This is the step every competing guide skips, and it’s where people lose work without realizing it.
- Edit a Copy with Lightroom Adjustments: the standard choice. Photoshop opens a new file with your Lightroom edits already baked in.
- Edit a Copy: opens a fresh copy without your Lightroom adjustments applied. Rarely what you want.
- Edit Original: reopens the actual layered Photoshop file from a previous round trip, with every layer intact. Use this when you’re going back to tweak text, a mask, or a layer you already built, not starting fresh.
Adobe’s own documentation confirms this exact three-way split for Lightroom Classic (source: Adobe, “Open and edit Lightroom Classic photos in Photoshop”, retrieved July 2026).

My pro tip: If you’re re-editing text or a mask you built last week, “Edit a Copy” feels like the safe choice. It isn’t. It throws away every layer and hands you a flattened image instead. Always pick “Edit Original” to get your layers back.
Step 4: Make Your Photoshop-Only Edits
Do the work Lightroom can’t: remove a large object with Content-Aware Fill, composite two exposures, add text, or apply a filter like Liquify.
If you’re combining multiple images, select them all in Lightroom first, then choose Open as Layers in Photoshop from the same Edit In menu. Photoshop builds one document with each photo as its own layer, already aligned to the same canvas.
Step 5: Save and Return to Lightroom
Press Save in Photoshop, not Save As. The file returns to Lightroom automatically, appended with “-Edit” in the filename, sitting right next to your original in the filmstrip.
Close Photoshop and finish any last touches back in Lightroom: crop, export settings, or a final color check against the rest of your gallery.
03.
Lightroom vs Lightroom Classic: How the Handoff Differs
The mechanism is the same in both apps, but two details change depending on which Lightroom you’re running.
| Detail | Lightroom Classic | Lightroom (cloud) |
| File format for Edit In | Your choice: PSD or TIFF | Always TIFF, no choice |
| Color space | Your choice: sRGB, Adobe RGB, or ProPhoto RGB | Fixed by Adobe, no choice |
| Where the file lives | Your local folder, relinked into the catalog | Uploaded to your Adobe cloud storage |
| Storage cost | One-time, your own hard drive | Counts against your monthly cloud plan |
Lightroom Classic lets you set these preferences once under Preferences > External Editing, and every future round trip uses them automatically. I run mine at ProPhoto RGB, 16-bit, TIFF, and haven’t lost color data on a handoff since.
Cloud Lightroom skips that choice entirely for simplicity, which is fine until you’re doing this daily and want control over file size. For the full cost picture of storing all those extra TIFFs in the cloud, see Lightroom and Photoshop Subscription: What You’re Actually Paying For.
04.
The Compounding File Problem
Here’s the part nobody warns you about: round-tripping the same photo more than once doesn’t overwrite the previous edit. It stacks.
Edit a photo in Photoshop once, and it comes back as “photo-Edit.tif.” Send that same file back to Photoshop and save again, and you get “photo-Edit-Edit.tif,” a third file, not a replacement for the second. Do this a few times across a shoot and your image count balloons far past what you’d expect.
- Your catalog now shows 3 or 4 versions of what you think of as “one photo”
- Delivery counts and culling totals get thrown off if you’re not tracking round trips
- Cloud Lightroom users see this hit their storage quota directly, since every version uploads in full
Fix: Use “Edit Original” (not “Edit a Copy”) whenever you’re going back into a file you’ve already round-tripped. It reopens the same layered file instead of generating a new one, which is the only way to avoid the pileup.
05.
Troubleshooting
| Problem | Symptom | Fix |
| Photoshop opens a flattened image with no layers | You chose “Edit a Copy” instead of “Edit Original” | Undo, return to Lightroom, right-click and choose Edit Original instead |
| Colors look duller after returning from Photoshop | External editing color space was set to sRGB, not ProPhoto RGB | In Lightroom Classic, go to Preferences > External Editing and switch to ProPhoto RGB, 16-bit |
| Catalog fills up with near-duplicate images | Multiple round trips on the same photo, each creating a new file | Use “Edit Original” for re-edits; periodically stack and clean up “-Edit-Edit” files |
| “Open as Layers” isn’t available | Only one photo was selected, or photos are different file types Photoshop can’t stack cleanly | Select 2 or more photos of the same type before choosing Edit In |
06.
FAQ
Does sending a photo to Photoshop delete my original?
No. Your original RAW or JPEG stays untouched in Lightroom. Photoshop always works on a new copy, which is why your catalog grows with every round trip.
Can I use Lightroom presets once I’m in Photoshop?
Not directly. Apply your preset in Lightroom before sending the file to Photoshop, since Photoshop has no equivalent preset panel that reads Lightroom’s Develop settings.
Why does Photoshop keep opening a blank layer instead of my edited photo?
You likely chose “Edit a Copy” instead of “Edit Original” on a file you’d already round-tripped. “Edit a Copy” always starts from a flattened version, discarding any layers from before.
Do I need Lightroom Classic to use Photoshop, or does cloud Lightroom work too?
Both work. Cloud Lightroom is simpler but gives you no control over file format or color space. Lightroom Classic lets you set both once and forget them.
Is there a way to avoid creating extra files every time?
Not entirely, since Photoshop always needs a rendered file to work with. The closest option is using virtual copies in Lightroom to test edit variations before you commit to a single version worth sending to Photoshop.
06.
Next Steps
Once this workflow feels natural, the next question most photographers hit is whether their Lightroom presets can travel into Photoshop at all. They can’t directly, and the workaround is covered in Can You Use Lightroom Presets in Photoshop?
If you’re still deciding whether you need Photoshop in your workflow at all, start with Lightroom vs Photoshop: Which One Do You Actually Need?
Related Articles
- Lightroom vs Photoshop: Which One Do You Actually Need?
- Can You Use Lightroom Presets in Photoshop?
- Lightroom and Photoshop Subscription: What You’re Actually Paying For
- How to Use Lightroom Presets: The Complete Workflow Guide
- The Best Lightroom Presets for Photographers in 2026
Richard is a commercial and editorial photographer with over 15 years behind the lens. He’s shot on film and digital across three continents, and still keeps a Nikon F3 loaded with Kodak Portra on his desk. At LegendaryPresets, he leads preset development – studying actual film scans to make sure every stock behaves like the real thing.