


Home | Articles | Adobe Lightroom
Can You Use Lightroom Presets in Photoshop?
Richard ♦ updated July 14, 2026 ♦ 9 min read

Yes, you can, just not the way you’d expect. Lightroom presets don’t work inside Photoshop’s main canvas tools, but they do work inside Adobe Camera Raw, the RAW engine built into Photoshop, because Camera Raw and Lightroom’s Develop module share the exact same settings format.
This guide covers both real methods for getting a Lightroom preset working in Photoshop, why the trick works at all, and the specific limitation that trips people up on certain preset types. For the broader question of which app to use for which job, see Lightroom vs Photoshop: Which One Do You Actually Need?
Key Takeaways
- Lightroom presets work in Photoshop through Camera Raw, not through Photoshop’s own tools directly
- The most reliable method copies the preset file straight into Camera Raw’s settings folder
- A second method uses Lightroom itself as a bridge, no file system access required
- Presets built on Lightroom Profiles don’t always translate cleanly to Camera Raw
- Once a preset is in Camera Raw, it applies to every future photo, not just the one you started with
01.
What You’ll Need
Gather these before starting, since both methods below assume you already have them ready:
- Photoshop with the Camera Raw plugin (included by default in every current version)
- The Lightroom preset file itself, an .xmp file, or access to Lightroom where the preset is already installed
- 5 minutes for the file-copy method, or about 10 minutes if you’re bridging through Lightroom
- Basic comfort navigating your operating system’s file folders, for Method 1 below
- No paid third-party conversion tools required for either method covered here
We build our film-emulation presets at Legendary Presets as standard Lightroom .xmp files, which is exactly the format both methods below depend on for a clean transfer into Camera Raw.
02.
Method 1: Copy the Preset File Directly Into Camera Raw
This is the faster, more reliable method, and it works whether you use Lightroom Classic or cloud Lightroom, since it never touches Lightroom’s interface at all.
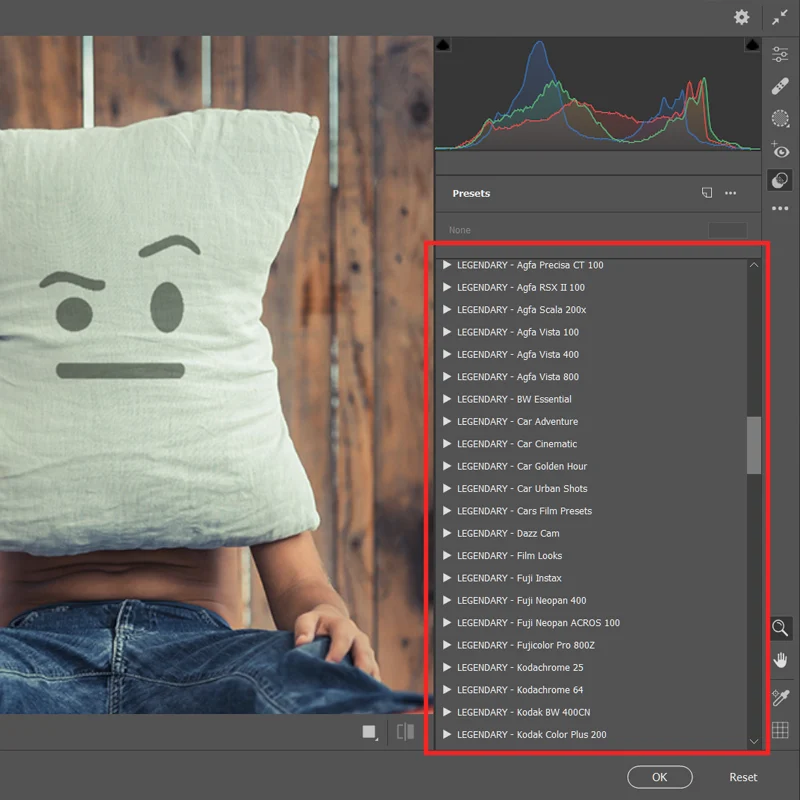
Step 1: Find Camera Raw’s settings folder
- Mac: ~/Library/Application Support/Adobe/CameraRaw/Settings
- Windows: C:Users[your username]AppDataRoamingAdobeCameraRawSettings
Step 2: Copy the preset file in
Drop the Lightroom preset’s .xmp file straight into that folder. No renaming, no conversion needed (source: Tutorial Pulse, “How to Use Lightroom Presets in Photoshop”, retrieved July 2026).
Step 3: Open the preset in Photoshop
Open any photo in Photoshop. Right-click the layer and choose Convert to Smart Object, then go to Filter > Camera Raw Filter. Click the Presets tab and your Lightroom preset appears in the list, ready to apply.
Watch out: Not every preset shows up here. Presets built on Lightroom Profiles (rather than standard Develop settings) often won’t carry over. See the limitations section below.
03.
Method 2: Use Lightroom as a Bridge
Use this method if you’d rather not dig through system folders, or if you only have the preset installed inside Lightroom itself.
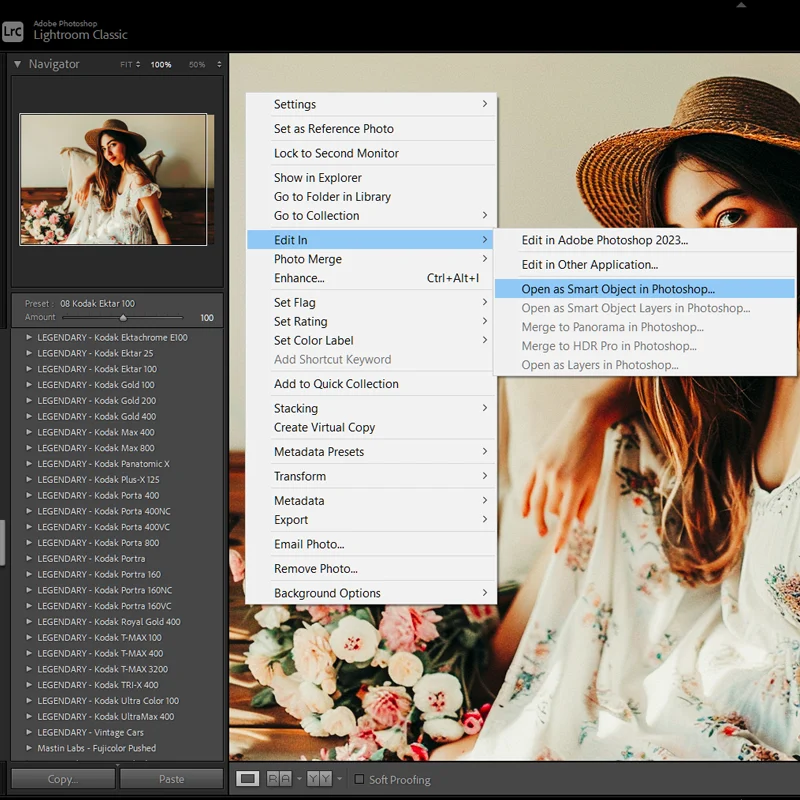
Step 1: Apply the preset in Lightroom
Open the photo, apply the preset in the Develop module, and confirm it looks right.
Step 2: Send it to Photoshop as a Smart Object
Right-click the photo and choose Edit In, then Open as Smart Object in Photoshop, not the regular “Edit in Photoshop” option. This keeps your Lightroom adjustments live inside the file instead of flattening them (source: PhotoshopCafe, “How to Use Lightroom Presets in Photoshop”, retrieved July 2026).
Step 3: Save the settings as a new Camera Raw preset
Double-click the Smart Object layer to reopen it in Camera Raw. In the Presets tab, click New Preset and save it under any name you want.
What just happened: Camera Raw captured every setting from your Lightroom preset and stored it as its own, permanent preset. You’ll never need to repeat this step for that look again.
Step 4: Apply it to future photos
From now on, that preset lives in Camera Raw’s Presets panel. Convert any new photo’s layer to a Smart Object, open the Camera Raw Filter, and it’s right there in the list.

My pro tip: Do this once per preset collection, not once per photo. Run every preset in a pack through this process in a single sitting and you’ll have your whole Lightroom preset library available inside Photoshop permanently.
04.
Why This Actually Works
Lightroom’s Develop module and Photoshop’s Camera Raw plugin are built on the same underlying processing engine. A Lightroom preset is really just a saved set of Develop instructions stored as an XMP file, and Camera Raw reads that exact same file format for its own presets.
That’s why copying the file works at all. You’re not converting anything. You’re just placing a file Camera Raw already knows how to read into the folder it looks in.
05.
What Doesn’t Carry Over Cleanly
Not every preset behaves identically once it’s inside Camera Raw.
- Profile-based presets: presets that rely on a custom Lightroom camera profile (rather than standard sliders) often don’t appear in Camera Raw’s list at all, since Camera Raw handles profiles separately from presets
- Preset intensity: Camera Raw adds an Amount slider that lets you dial a preset’s strength up or down, a control Lightroom’s own preset panel doesn’t expose the same way
- Local adjustments: any masking, brushes, or gradients baked into a Lightroom preset apply at the global level only in Camera Raw, so highly localized presets can look flatter than they did in Lightroom
If a preset looks wrong after import, it’s almost always one of these three reasons, not a broken file.
06.
Troubleshooting
| Problem | Cause | Fix |
| Preset doesn’t appear in Camera Raw’s Presets tab | File wasn’t placed in the correct settings folder, or Photoshop needs a restart | Confirm the exact folder path and restart Photoshop after copying the file |
| Preset applies but looks completely different than in Lightroom | The preset is Profile-based, not a standard Develop preset | Rebuild the look manually in Camera Raw, or use Method 2 to capture it as a fresh ACR preset |
| Camera Raw Filter option is grayed out | The layer wasn’t converted to a Smart Object first | Right-click the layer, choose Convert to Smart Object, then try again |
| Preset looks weaker or stronger than expected | Camera Raw’s Amount slider is set below or above 100% | Open the Camera Raw Filter, find the Amount slider, and set it to 100% to match the original strength |
07.
Lightroom Presets in Photoshop: Method Comparison
| Method | Setup Time | Best For |
| Copy file directly | About 5 minutes | Getting a whole preset pack into Photoshop permanently |
| Bridge through Lightroom | About 10 minutes | One-off presets you’ve already built or tweaked in Lightroom |
08.
FAQ
Do Lightroom presets work directly in Photoshop’s regular tools?
No. Photoshop’s standard editing tools have no preset system that reads Lightroom’s XMP files. Presets only work through Camera Raw, accessed via the Camera Raw Filter on a Smart Object.
Will my preset look exactly the same in Photoshop as it does in Lightroom?
Usually, yes, for standard Develop-based presets. Profile-based presets and any preset with local masking baked in won’t translate perfectly, since Camera Raw applies adjustments globally.
Do I need Lightroom installed to use Lightroom presets in Photoshop?
No. Method 1 only requires the .xmp preset file itself, copied into Camera Raw’s settings folder. You never need to open Lightroom.
Are Lightroom presets the same thing as Photoshop Actions?
No. Presets are Develop settings applied through Camera Raw. Actions are recorded sequences of manual steps. They produce similar results but aren’t interchangeable files, and one can’t be converted into the other automatically.
Does this work with Lightroom Classic and cloud Lightroom presets?
Yes, both. The preset file format is identical either way. Method 1 doesn’t care which Lightroom version you used to create it, since it works directly with the file.
09.
Next Steps
Once your presets are working inside Camera Raw, the next logical step is understanding the full round trip between the two apps, including what happens to files you edit further in Photoshop. See Using Lightroom and Photoshop Together: How It Works for the complete breakdown.
If you’re still weighing whether you need Photoshop in your workflow at all, start with Lightroom vs Photoshop: Which One Do You Actually Need?
Related Articles
- Lightroom vs Photoshop: Which One Do You Actually Need?
- Using Lightroom and Photoshop Together: How It Works
- Lightroom and Photoshop Subscription: What You’re Actually Paying For
- How to Use Lightroom Presets: The Complete Workflow Guide
- The Best Lightroom Presets for Photographers in 2026
Richard is a commercial and editorial photographer with over 15 years behind the lens. He’s shot on film and digital across three continents, and still keeps a Nikon F3 loaded with Kodak Portra on his desk. At LegendaryPresets, he leads preset development – studying actual film scans to make sure every stock behaves like the real thing.