Home | Articles | Analog Film
What Are Lightroom Presets? A Complete Beginner’s Guide
Richard ♦ June 17, 2026 ♦ 14 min read
A Lightroom preset is a saved set of editing adjustments that applies to your photo in one click. Instead of moving 20 different sliders every time you edit, you click once and Lightroom adjusts exposure, color, contrast, tone, and more, all at the same time.
That’s the short answer. If you want to understand what presets actually do, why photographers use them, and how to choose the right one for your photos, keep reading. This guide covers everything from scratch.
Legendary Presets builds its entire collection around this idea, one click gets you 80% of the way to a finished image, then you fine-tune the rest. Whether you are editing portraits, travel shots, or everyday photos, the right preset makes the difference between a flat digital image and one that actually looks finished.
Key Takeaways
- A Lightroom preset is a one-click set of saved adjustments, exposure, color, tone, grain and more applied simultaneously
- Presets are non-destructive: you can undo, adjust, or remove them at any time without damaging your original photo
- Presets are not the same as Instagram filters, they give you full control over every setting after applying
- RAW files respond better to presets than JPEGs, more tonal range means more room to work
- Film presets are the most popular category in 2026 because they produce consistent, natural-looking results across different lighting conditions
- You can use presets on desktop (Lightroom Classic and CC) and on your phone (Lightroom Mobile, free version included)
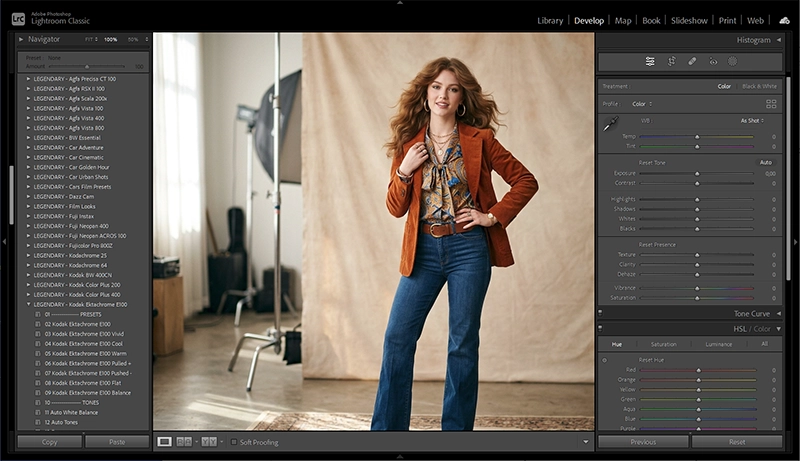
01.
What Does a Lightroom Preset Actually Do?
When you apply a preset, Lightroom moves a set of sliders to pre-saved positions all at once. Those sliders live across multiple panels:
- Exposure and tone, how bright or dark the image is, how the highlights and shadows behave
- Tone curve, the overall contrast shape, where shadows sit, how highlights roll off
- White balance, how warm or cool the colors appear
- HSL panel, individual control over hue, saturation, and brightness of each color channel
- Color grading, separate color tints applied to shadows, midtones, and highlights
- Grain, the texture added to the image to simulate film
- Sharpening and noise reduction, detail recovery settings

When you apply a preset, Lightroom adjusts multiple panels at once, tone curve, HSL, color grading, grain, and more, all calibrated to work together. A good preset adjusts all of these together in a way that’s calibrated to produce a specific look. A bad preset just pushes a few sliders and hopes for the best.
The key thing to understand: presets are non-destructive. Applying a preset does not change your original photo file. Everything happens inside Lightroom’s database. You can remove the preset, change it, or adjust any individual slider after applying, your original image is always intact.
02.
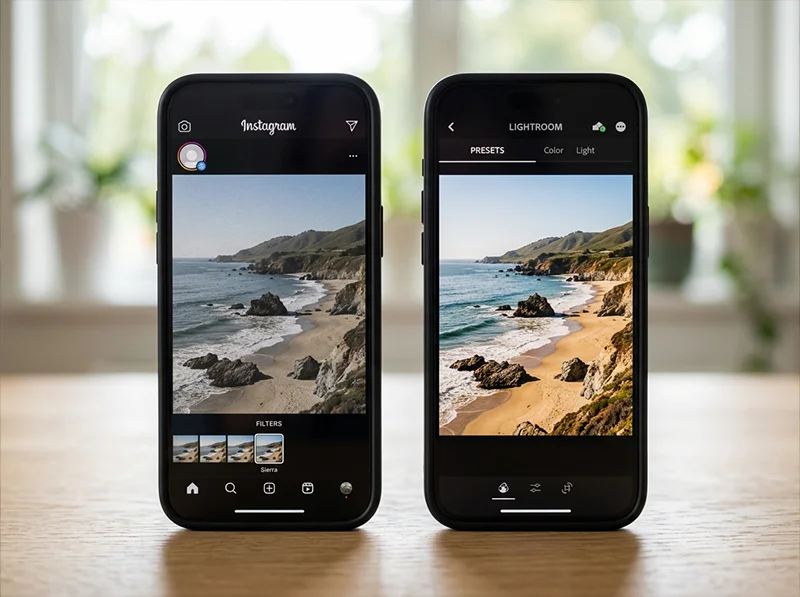
Presets vs Instagram Filters: What’s the Difference?
This is the most common question beginners ask, and it matters.

Instagram filters apply a fixed look with no room to adjust. Lightroom presets give you a professional starting point you can fine-tune to fit your image. Instagram Filters Lightroom Presets Control after applying Almost none Full, every slider adjustable Works on RAW files No Yes Non-destructive No, baked into the image Yes, original always preserved Batch editing No Yes, apply to hundreds of photos at once Adjustable strength Limited Full opacity control Consistent across lighting Rarely Yes, when used correctly Instagram filters apply a fixed look with no way to fine-tune it. Lightroom presets give you a starting point, a professional-calibrated starting point, and then let you adjust every element until it fits your specific photo and light. That’s the practical difference between a filter and a tool.
03.
Why Do Photographers Use Presets?
Speed. A good preset gets you 80% of the way to a finished image on a well-exposed photo. You adjust exposure and white balance, maybe tweak one or two sliders, and you’re done. That’s the difference between 3 minutes per image and 25 minutes per image when editing a full shoot.
Consistency. If you shoot a 300-photo wedding or a travel series across a week, applying the same preset keeps every image in the gallery looking like it came from the same session. That cohesion is what separates a professional gallery from a collection of random edits.
A starting point, not a final answer. The best way to think about presets is as a calibrated starting point rather than a finished result. You apply the preset, then make the small adjustments that fit your specific image, a slight exposure tweak, a white balance shift, maybe a touch of dehaze. The preset does the heavy lifting; you make it personal.
Learning by doing. When you apply a preset and then look at what it changed, you learn what those settings do. After a few weeks of using good presets, you develop an instinct for what makes an image work. That’s something no Lightroom tutorial teaches as efficiently as actually editing your own photos.
I’ll be direct about one thing I learned the hard way: presets do not fix bad photos. For years I applied presets to underexposed, flat frames hoping the warmth would save them. It never did. A preset adds character to a strong image, it cannot inject character into a weak one. Expose correctly in camera, get good light, then let the preset do its job.
04.
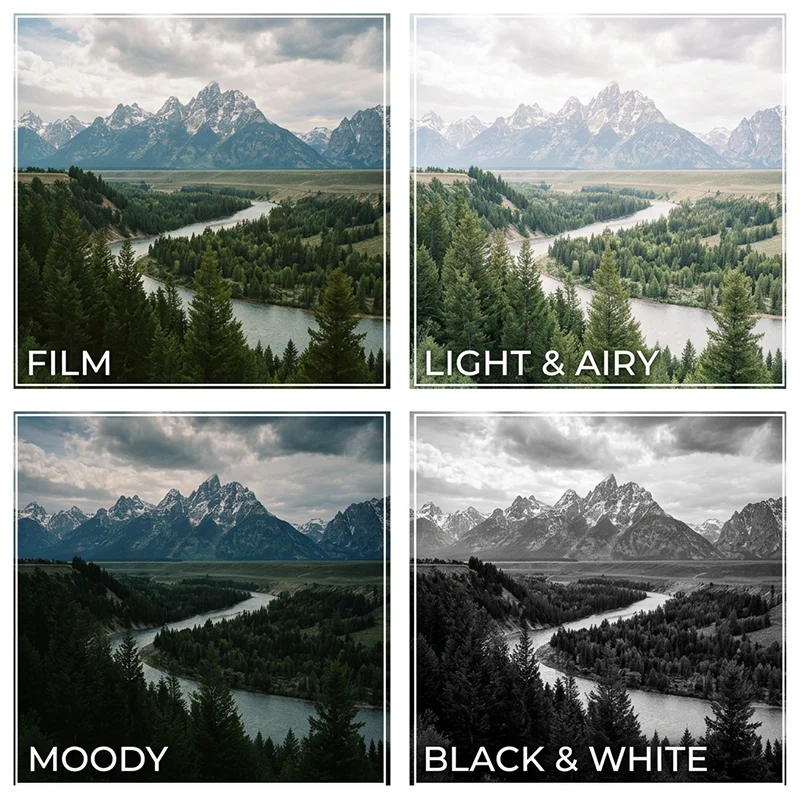
Types of Lightroom Presets

Film, light and airy, moody, and black and white, four preset styles, one scene. Each serves a different subject and mood. Film presets are the most popular category right now, and for good reason. They replicate the color science, grain structure, and tonal character of real analog film stocks, Kodak Portra, Fujichrome Velvia, Agfa Vista, and dozens of others. Film presets tend to produce consistent, natural-looking results across different lighting because the original film stocks were designed to handle a wide range of light. They are the closest thing to a universally flattering preset.
Light and airy presets lift shadows, soften contrast, and push colors toward pastel tones. Popular for lifestyle photography, family sessions, and bright indoor portraits. They work well in good natural light but can look washed out in flat or artificial light.
Moody presets crush the shadows, increase contrast, and push colors toward darker, more saturated tones. Common in wedding photography, landscape work, and editorial photography. Require careful use, they can make skin tones look muddy if the white balance is off.
Cinematic presets add color grading that mimics the look of film and television color correction, teal shadows, warm highlights, compressed contrast. Popular on social media and with videographers who also shoot stills.
Black and white presets convert color images to grayscale while controlling how each color translates into a tone. A yellow sky can go bright or dark depending on the preset. These require more attention to the original lighting conditions than color presets.
05.
Free vs Paid Presets: What’s Actually Worth It?
Free presets are a reasonable way to start. You can find solid options from photography blogs and preset companies offering samples. The limitations show up quickly though, most free presets are one or two variations of the same look, with no brand context, no genre guidance, and no guarantee they were built from real film data. For a full breakdown of what’s actually worth downloading, see our guide to free Lightroom presets.
Paid presets, when bought from a reputable source, give you:
- Multiple variations per stock (base, warm, cool, pushed, pulled)
- Presets tested across different cameras and lighting conditions
- A full collection that covers multiple scenarios rather than one look
- Technical accuracy in how the color science is built
The price range for a quality preset pack runs from $20 to $50 for a single stock, or $50 to $150 for a full brand collection covering multiple films. That’s a one-time cost for a tool you use on every shoot.
One honest note: the most expensive preset is not always the best one for your photos. The right preset is the one that fits your subject, your light, and your shooting style. A $30 film preset that matches how you naturally shoot is worth more than a $100 pack that fights your color instincts every time you apply it.
06.
How to Choose the Right Preset for Your Photos
Match the preset to your subject first, not to what looks good in the preview thumbnail.
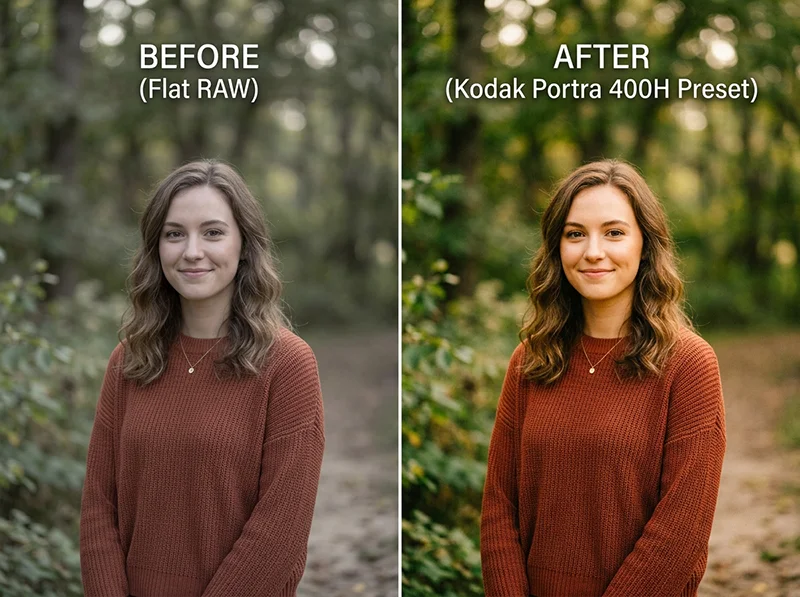
- Portraits and weddings: Look for presets built around film stocks designed for skin tones, Kodak Portra 160, Kodak Portra 400, Fujifilm Pro 400H, Fujichrome Astia 100F. These were chemically engineered to flatter human skin. That science carries into well-built presets.
- Travel and landscape: Stocks with more saturation and contrast work well here, Fujichrome Velvia 100 for vivid greens and skies, Kodak Ektar 100 for bold color with fine grain, Agfa Vista 400 for punchy, warm outdoor shots.
- Street and documentary: Kodak TRI-X 400 in black and white is the classic choice, high contrast, heavy grain, the look of photojournalism from the 1960s onward. For color street work, Kodak Gold 200 and Agfa Vista 400 give a candid, lived-in quality.
- Everyday and lifestyle: Consumer film stocks like Kodak Gold 200, Fujifilm Superia 400, and Kodak Color Plus 200 are low contrast and approachable. They feel like nostalgia without being dramatic, the preset equivalent of a disposable camera, which is exactly right for casual, warm lifestyle shots.
- Think about your light. Warm presets (Kodak family) work naturally in golden hour and tungsten light. Cool presets (Fuji family) handle midday sun and overcast conditions without going grey. Applying a warm preset to a flat overcast scene creates a color cast that takes longer to fix than just starting over.
Browse the full film presets collection organized by brand, Kodak, Fuji, and Agfa, to find the stock that fits how you shoot.
07.
How to Apply a Preset in Lightroom
Applying a preset in Lightroom Mobile takes one tap. Browse the panel, tap to apply, adjust exposure if needed. Lightroom Classic (desktop):
- Open your image in the Develop module
- Find the Presets panel on the left sidebar
- Hover over any preset name to preview it in real time on your image
- Click to apply
- Adjust exposure first, then white balance if needed
Lightroom CC (cloud desktop):
- Open an image in edit mode
- Click the Presets icon in the right panel
- Browse by category, click to apply
- Use the opacity slider (tap the preset name again) to reduce the effect strength if needed
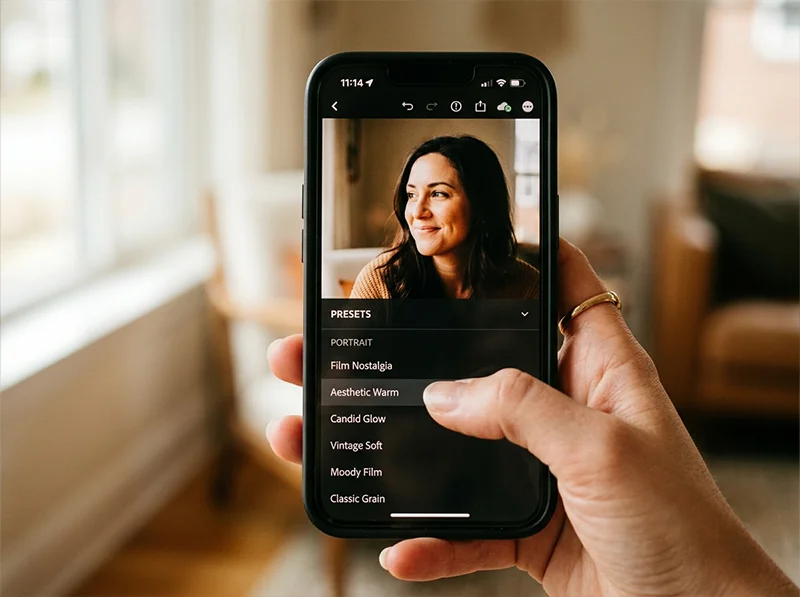
Lightroom Mobile (iPhone and Android):
- Open a photo and tap Edit
- Tap the Presets icon at the bottom
- Browse and tap to apply
- Adjust exposure after applying
For full installation instructions across every platform, see our how to install Lightroom presets guide. For a deeper look at getting the most out of presets once they are installed, see our complete guide to how to use Lightroom presets.
08.
Three Things to Do After Applying a Preset
- Fix exposure first. Presets are calibrated for neutral exposures. If your image is slightly over or underexposed, correct that after applying the preset, not before. The preset’s tone curve behaves differently on a heavily corrected image.
- Check white balance. If skin tones look orange, the preset is running warm for your specific light, drop the color temperature 100–200K. If the image looks flat and grey, push it slightly warmer. White balance is the fastest fix for a preset that looks almost right but not quite.
- Reduce grain on high-resolution files. A grain setting built for a 20-megapixel camera can look heavy on a 45-megapixel file. If the grain looks digital rather than analog, reduce the Amount slider in the Detail panel by 20–30%.
09.
FAQ
Do Lightroom presets work on my phone?
Yes. Lightroom Mobile on both iPhone and Android supports presets. You can install them directly on the app or sync them from a desktop version if you have an Adobe account. The free version of Lightroom Mobile supports preset installation and use. For a full guide to using presets on your phone, see our Lightroom Mobile presets guide.
Are presets only for professional photographers?
No. Presets are actually more useful for beginners than for experts, because they do the heavy lifting while you learn. Applying a well-built preset and then studying what it changed is one of the fastest ways to understand photo editing.
Can I use presets on phone photos?
Yes. Lightroom Mobile handles iPhone and Android photos just as well as camera files. Presets designed for RAW files will work on phone RAW files (if your phone shoots RAW). On JPEGs from your phone, the results are slightly more limited but still useful.
Do presets work differently on different cameras?
Yes, slightly. A preset calibrated on a Canon sensor may look slightly different on a Sony or Nikon. The core look holds, but you may need small white balance adjustments depending on your camera’s color profile. This is normal and expected.
What is the difference between a preset and a profile?
Profiles work at a deeper level than presets, they adjust how your RAW file is interpreted before the panel controls are applied. Presets adjust the panel controls on top of whatever profile is active. Many professional preset packs include both. You can use a profile and a preset together.
Can I make my own presets?
Yes. Once you have an edit you like, go to the Presets panel, click the plus icon, and choose Create Preset. Name it, select which settings to save, and click Create. Your preset is now available for every image going forward.
If you want to go deeper on what makes film presets different from other types, our complete guide to Lightroom film presets covers the color science, grain structure, and technical build of each stock in detail.
Ready to find the right preset for your photos? See the best Lightroom presets for photographers broken down by subject and shooting style. Looking for options that won’t cost anything upfront? Browse our guide to free Lightroom presets. Editing on your phone? The Lightroom Mobile presets guide covers everything from installation to workflow. And when you are ready to install, our how to use Lightroom presets guide walks you through the full post-install workflow.
Browse our full film preset collection to find the look that fits your shooting style.
Related Articles
- The Best Lightroom Presets for Photographers in 2026
- How to Install Lightroom Presets on Desktop, Mobile and Photoshop
- How to Use Lightroom Presets: The Complete Workflow Guide
- Lightroom vs Lightroom Classic: Which One Do You Actually Need?
- What Are Lightroom Film Presets? The Definitive Guide
Richard is a commercial and editorial photographer with over 15 years behind the lens. He’s shot on film and digital across three continents, and still keeps a Nikon F3 loaded with Kodak Portra on his desk. At LegendaryPresets, he leads preset development – studying actual film scans to make sure every stock behaves like the real thing.