


Home | Articles | Analog Film
Ektachrome vs Portra for Portraits: Which Kodak Film Look Actually Works?
Richard ♦ June 14, 2026 ♦ 13 min read

Ektachrome vs Portra for Portraits: Which Kodak Film Look Actually Works?
The honest answer: Portra wins most portrait sessions. It’s warm, forgiving, and built for skin. But there are specific situations where Ektachrome E100 does something Portra simply can’t — and knowing which is which makes you a better editor, not just a better preset user.
I’ve shot portraits on both films. Actual rolls, actual lab processing. The difference isn’t subtle once you know what you’re looking at, and it carries directly into how you build the Lightroom edit. This article breaks down where each film excels, when to choose E100 for portraits, and how to make the Ektachrome look work on faces without the skin tones going cold or magenta.
For a fast starting point, the Kodak Ektachrome E100 presets at Legendary Presets are built from actual E100 scans and include portrait-specific variations. But the settings in this guide will help you understand what to adjust and why.
Key Takeaways
- Ektachrome E100 and Kodak Portra 400 produce fundamentally different portrait results, not better or worse, different
- E100 works best for editorial, fashion, and environmental portraits where you want definition over warmth
- Portra is the safer call for weddings, families, and any portrait where skin flattery is the first priority
- The magenta push in E100’s warm tones needs active correction, Red Hue and Orange Saturation both require adjustment
- Ektachrome portraits need more careful light than Portra, the narrower exposure latitude means lighting mistakes are harder to fix in post
- Cool light (overcast, open shade, north-facing window) suits E100 portraits better than warm artificial light
01.
Ektachrome vs Portra: What Actually Differs in Portraits
This is the question that should open every Ektachrome portrait session, because the answer changes what you shoot, how you light it, and how you edit it.

Kodak Portra 400, what it does for skin
Portra was designed for professional portrait and wedding work. Its colour rendering prioritises skin, warm, slightly flattering, with a bias toward yellow-orange that makes faces look healthy and alive. The exposure latitude is wide (3–4 stops), which means slight overexposure just goes creamy rather than clipped. Labs and scanners developed their own Portra corrections over decades, adding another layer of warmth.
In Lightroom, a Portra-style edit starts with warmth and builds from there. You’re protecting that orange-skin bias, not fighting it.
Kodak Ektachrome E100, what it does to skin
E100 was not designed for portraits. It was designed for editorial, product, and travel work where colour accuracy mattered more than flattery. Its daylight balance is cooler and more literal than Portra, skin reads accurately rather than warmly, which means it can go slightly cool or magenta without deliberate correction.
The upside is that E100 portraits have a quality Portra can’t match: definition. The microcontrast, clean whites, and precise colour make subjects look sharp and present rather than soft and dreamy. Fashion photographers used transparency films like Ektachrome precisely because that clarity reproduced well in print.
The comparison in a table
| Kodak Ektachrome E100 | Kodak Portra 400 | |
| Skin rendering | Accurate, slightly cool | Warm, flattering |
| Exposure latitude | Narrow (~1 stop) | Wide (3–4 stops) |
| Contrast | Medium-high, baked in | Low-medium, adjustable |
| White character | Cool, clean | Creamy |
| Best portrait use | Editorial, fashion, environmental | Wedding, family, soft portraiture |
| Forgiveness | Low, needs careful exposure | High, latitude saves mistakes |
| Lightroom starting point | Correct skin actively | Protect warmth |
02.
When to Choose Ektachrome Over Portra for Portraits
Use Ektachrome E100 for portraits when you want definition, editorial clarity, or a cool, precise look, environmental portraits in urban settings, fashion work, or any session where the background and subject need equal visual weight. Use Portra 400 when skin warmth and forgiveness are the priority: weddings, families, soft studio work. Ektachrome requires more careful light and active skin tone correction in Lightroom; Portra tolerates more variation and rewards less intervention.
03.
When Ektachrome Actually Works for Portraits
Editorial and fashion
This is where E100 was used on film, and it still works for the same reason: the cool, contrasty rendering makes clothes, textures, and environments look as sharp as the subject. A fashion portrait on Portra can look too soft, the warmth blurs the distinction between subject and scene. E100 keeps everything crisp.
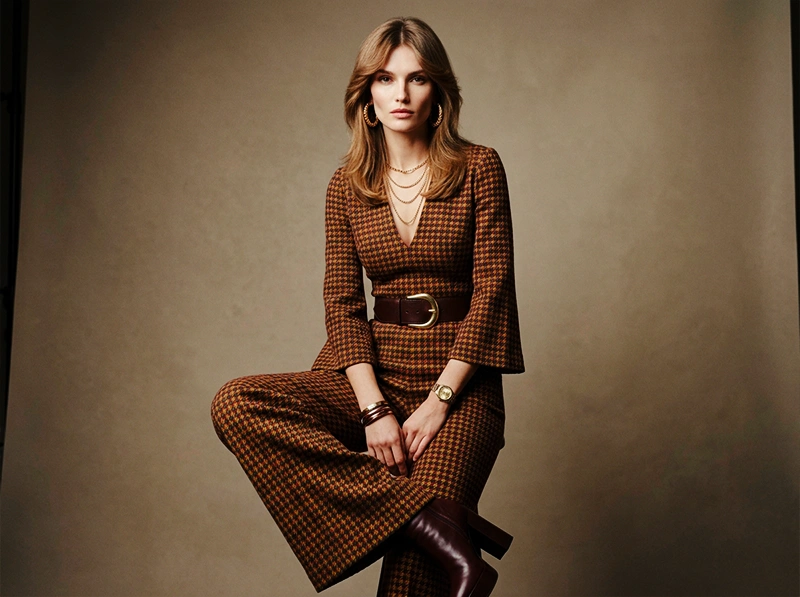
For fashion-style portraits in Lightroom, lean into the contrast rather than fighting it. Let the Tone Curve add definition, keep the whites clean, and use the cool background as part of the composition rather than trying to warm the whole frame.
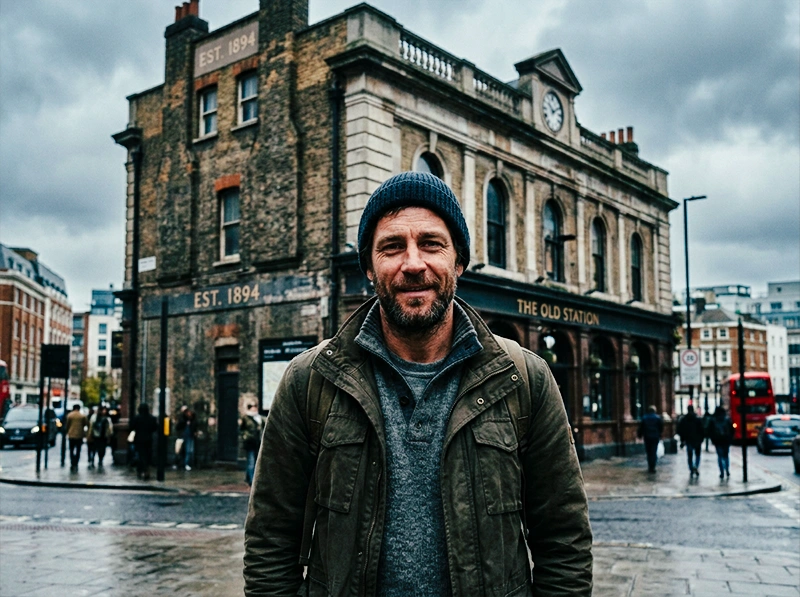
Environmental portraits outdoors
Ektachrome’s deep blues and clean greens make outdoor environmental portraits, a subject in front of a city skyline, a traveller against a coastal backdrop, feel vivid and dimensional. The environment itself becomes part of the image rather than just a background. This is the one area where E100 can outperform Portra for portraits: when the setting matters as much as the person.
Overcast and open shade
This surprises people, but overcast light and E100 work well together for portraits. The soft, directionless light reduces harsh shadows, which is where E100’s narrow latitude hurts most. The cool, even illumination also matches E100’s natural white balance, which means less correction needed for both the background and the skin.
Avoid warm tungsten or mixed indoor light with E100 portraits, the film’s daylight balance creates colour casts that need a lot of correction and rarely look natural.
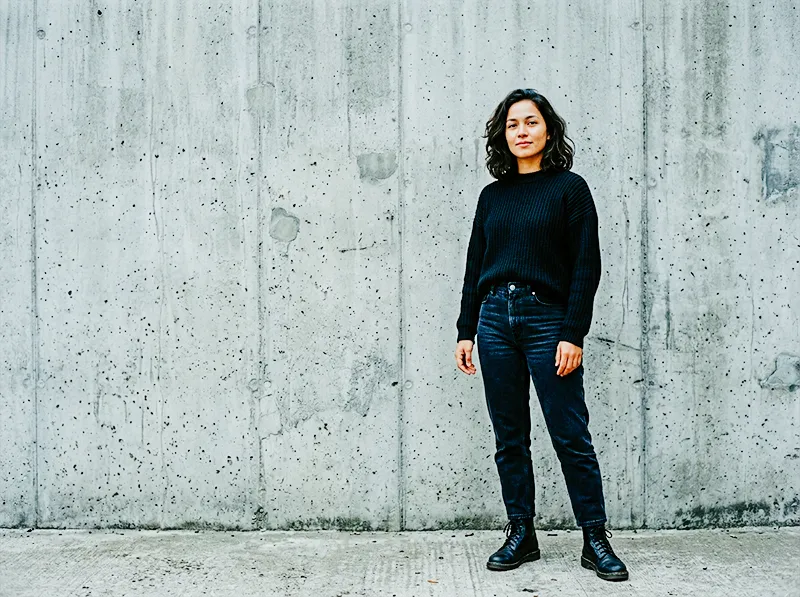
Black clothing, architecture, strong backgrounds
Any portrait where the non-skin elements are doing significant visual work suits E100. Dark clothing, stone buildings, graphic backgrounds, these all benefit from E100’s contrast and colour accuracy in a way that Portra, with its warmth bias, can’t provide.
Good film editing starts with choosing the right stock for the job, the full Kodak Lightroom presets range gives you every option in one place.
04.
The Lightroom Workflow for Ektachrome Portraits
Step 1: Protect highlights before anything else
Ektachrome’s narrow latitude means you fix this first, before any colour work. Pull Highlights down to –40 to –60. Hold Alt/Option on Whites and drag until clipping disappears. If you’re shooting with a bright background or window light, check the histogram before moving on, what clips in camera stays clipped.
This step matters more for E100 portraits than for Portra edits. With Portra you can sometimes rescue a slightly hot exposure in the highlight slider. With E100 that rescue is much smaller.
Step 2: Cool the white balance, carefully
E100’s daylight balance is around 5500K but reads slightly cooler in practice. For portraits:
- Temp: 5000K–5400K. Don’t go below 5000K, you’ll push skin into grey territory
- Tint: 0 to +3 (very slight magenta, not green), this is the opposite of a landscape E100 edit. For portraits you need to hold the tint to prevent skin going green-tinged
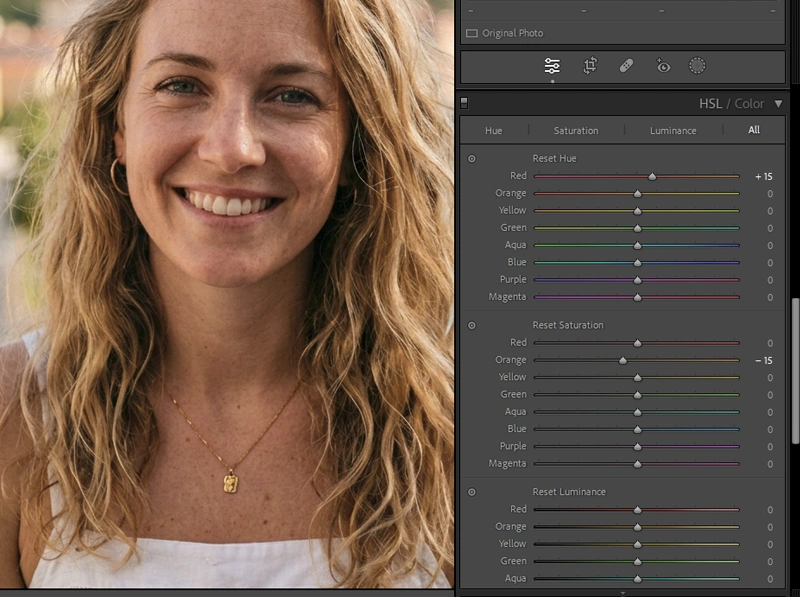
Step 3: Skin tone correction in HSL (the critical step)
This is where most Ektachrome portrait edits fail. E100 pushes the red-orange channel toward magenta, left uncorrected, skin looks off in a way that’s hard to name but immediately visible. Two moves:
- Red Hue: +5 to +10 toward orange. This pulls the red channel away from magenta and toward the warmer, more natural red that skin actually is
- Orange Saturation: –8 to –15. Pulls back the saturation in the skin-tone range without desaturating the whole image
Check this adjustment on the face specifically using the Targeted Adjustment Tool, click directly on skin and drag to see which channels are actually carrying the tone. Every camera renders skin slightly differently, so the exact values shift between camera brands.
A note on camera brand differences: Canon sensors tend to render skin with more red, which means the Red Hue shift needs less correction (around +3 to +5). Sony sensors push slightly more toward orange, which means Orange Saturation needs more attention. Fujifilm’s own colour science warms skin independently, which can interact with E100 adjustments unexpectedly, dial back the Red Hue shift to +2 to +4 on Fuji files.
Step 4: Tone Curve for editorial contrast
The Tone Curve for an Ektachrome portrait edit is slightly different from the travel or architecture version. You want the contrast without the harshness:
- Highlights anchor: pull down to –12 to –18 (less aggressive than the landscape edit)
- Shadow anchor: lift very slightly, +5 to +8
- Midtones: keep flat, this is where skin texture lives
Don’t use the Contrast slider. It compresses midtones symmetrically and makes skin look flat rather than defined.
Step 5: Clarity: less than you think
The temptation with Ektachrome portraits is to push Clarity for that sharp, editorial feel. Resist it. Clarity adds micro-contrast across the whole image, including skin, and it does this in a way that creates texture where you don’t want it.
For portraits, keep Clarity at 0 to +5 maximum on the global panel. If you want edge definition on eyes, hair, or clothing, use a Masking adjustment with Clarity applied locally, add a Subject mask and push Clarity only outside the skin tones.
Step 6: Vibrance over saturation
Same principle as the landscape edit: Vibrance +10 to +15, Saturation at 0 or +3 maximum. For portraits this matters more than for landscapes, oversaturation shows immediately on skin and clothing.
Step 7: Grain
Fine grain, same settings as the full E100 workflow: Amount 15–20, Size 20–25, Roughness 40–50. Keep it lighter than a landscape edit, portrait viewers look at skin closely, and grain that reads as texture on a stone wall reads as blemish on a face.
05.
Lightroom Settings at a Glance
| Adjustment | Portrait range | vs. Landscape edit |
| Highlights | –40 to –60 | Similar, slightly less aggressive |
| White Balance Temp | 5000K–5400K | Same starting point |
| Tint | 0 to +3 | Opposite, landscapes go –5 |
| Red Hue | +5 to +10 | Portraits need more correction |
| Orange Saturation | –8 to –15 | Portraits need reduction, not boost |
| Clarity | 0 to +5 global | Landscapes allow +8 to +12 |
| Vibrance | +10 to +15 | Slightly less than landscape |
| Grain Amount | 15–20 | Lighter than landscape (15–25) |
06.
FAQ
Is Ektachrome or Portra better for portraits?
Portra 400 is the safer choice for most portrait work, it’s warm, forgiving, and built for skin. Ektachrome E100 works better for editorial, fashion, or environmental portraits where definition and colour precision matter more than flattery. The choice depends on what the portrait is for, not which film is technically superior.
Why do skin tones look magenta in my Ektachrome Lightroom edit?
E100 pushes the red-orange channel toward magenta. Fix it with two HSL adjustments: Red Hue shifted toward orange (+5 to +10) and Orange Saturation reduced (–8 to –15). Use the Targeted Adjustment Tool clicked directly on skin to confirm which channels are carrying the tone on your specific camera.
Can I use Ektachrome for wedding portraits?
You can, but it requires more work than Portra. E100’s narrow exposure latitude and cooler skin rendering mean you need precise lighting, careful white balance, and active skin correction in post. For documentary-style wedding coverage where light is variable, Portra is a much more practical choice. For posed editorial wedding portraits in controlled light, E100 can work beautifully.
What lighting works best for Ektachrome portraits?
Soft, cool, directional light, overcast outdoor, open shade, or a large north-facing window. E100 is daylight-balanced and its cooler rendering works with cool light sources rather than against them. Avoid warm tungsten or mixed indoor light, which creates colour casts that are difficult to fully correct without shifting the overall palette.
How is the Ektachrome portrait edit different from the landscape edit?
The key differences: portraits use a warmer Tint (0 to +3 vs. –5 for landscapes), less Blue Luminance reduction, active Red Hue and Orange Saturation correction, and much less Clarity. The film character is the same but the priorities flip, for landscapes you use E100’s coolness; for portraits you correct for it.
07.
Final Thoughts
Ektachrome E100 is not the natural portrait film. Portra is. But that doesn’t make it wrong for portraits, it makes it a deliberate choice that produces a specific result: editorial definition, cool precision, and a clarity that reproduces well in print and on screen.
The edit requires more attention than a Portra workflow. Skin tones need active correction. Light needs to be controlled. Clarity needs to stay restrained. But when those things are in place, E100 portraits have a quality that’s hard to achieve any other way.
For the full E100 Lightroom workflow covering travel and landscape, see what is the Ektachrome look and how to get it in Lightroom. For architecture-specific E100 editing, the slide-film aesthetic for architecture guide covers highlight handling for complex scenes. And if you want to understand how E100’s colour science compares to Fuji slide films, Fuji vs. Kodak colour science in Lightroom breaks it down directly.
The Kodak Ektachrome E100 presets include portrait-specific variations with the skin tone corrections already dialled in, a useful reference point when you’re building your own edit from scratch.
The film preset collection spans everything from fine grain portrait emulsions to high contrast slide films, one library covering the full width of what analog photography had to offer.
Richard is a commercial and editorial photographer with over 15 years behind the lens. He’s shot on film and digital across three continents, and still keeps a Nikon F3 loaded with Kodak Portra on his desk. At LegendaryPresets, he leads preset development – studying actual film scans to make sure every stock behaves like the real thing.