Home | Articles | Analog Film
How to Use Lightroom Presets: The Complete Workflow Guide
Richard ♦ June 17, 2026 ♦ 12 min read

Installing a preset is the easy part. Getting consistently good results from it is where most photographers get stuck. This guide covers everything that happens after the preset is installed: how to apply it correctly, in what order, what to adjust, how to batch edit an entire shoot, and how to build a workflow that saves real time rather than just promising to.
If you have not installed your presets yet, start with our how to install Lightroom presets guide, then come back here.
Key Takeaways
- Apply the preset before correcting exposure or white balance, not after, the tone curve is calibrated for a neutral starting point
- Fix exposure first after applying, then white balance, then any individual color adjustments
- On a well-exposed RAW file, a good preset should get you 80% of the way to a finished image with no further adjustment
- Batch editing works best when you apply the preset to one reference image, perfect it, then sync those settings across the rest of the shoot
- The Opacity slider in Lightroom CC and Mobile lets you blend a preset at any strength between 0 and 100%
- Film presets are built for RAW files, on JPEGs the tone curve has less room to work and results will be more limited
01.
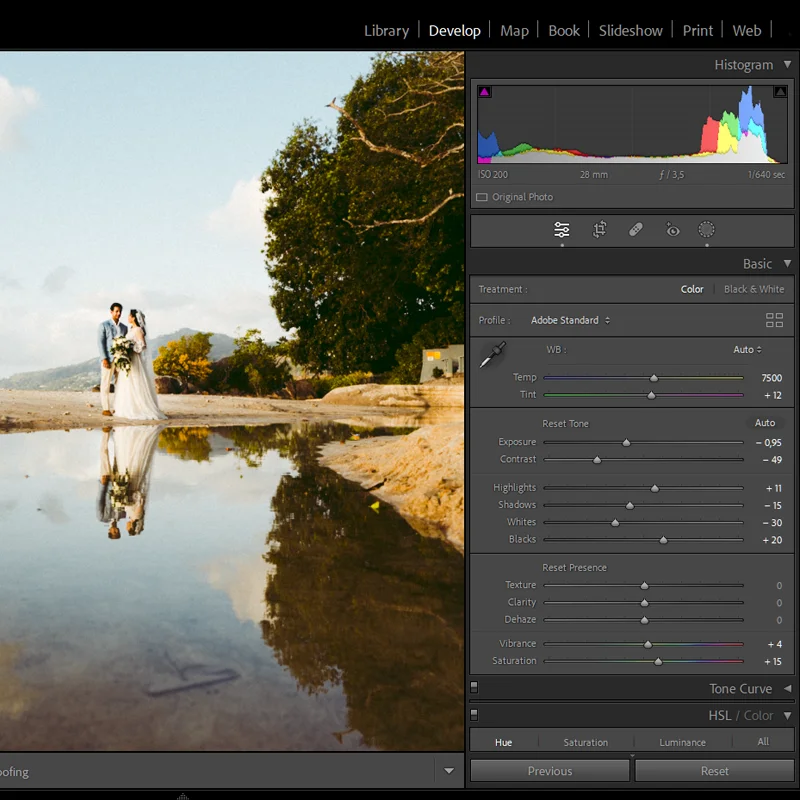
The Right Order: Why It Matters
Most photographers get this backwards. They correct the exposure, fix the white balance, then apply the preset. The preset then fights every adjustment already made because its tone curve is calibrated for a neutral base.

Apply the preset first. Then correct exposure. Then white balance. In that order, the preset’s tone curve works with your adjustments rather than against them. The correct order is:
- Apply the preset first to the neutral RAW file
- Correct exposure, the preset may shift the overall brightness slightly; bring it back to where it should be
- Adjust white balance, if skin tones look orange, cool the temperature 100 to 200K; if the image looks flat and grey, push it slightly warmer
- Tweak individual adjustments, grain on high-resolution files, clarity, any HSL channels that need minor correction for your specific light
- Export
This sequence works because the preset’s tone curve, color grading, and HSL values are all calculated relative to a neutral starting point. Apply them on top of heavily adjusted values and the calibration breaks down.
02.
How to Apply a Preset in Lightroom Classic
- Open your image in the Develop module
- Find the Presets panel on the left sidebar
- Hover over a preset name to preview it in real time on your image in the Navigator window above
- Click to apply
- The preset updates every relevant panel simultaneously: Tone Curve, HSL, Color Grading, Detail, Camera Calibration
Tip: Use the Before/After view (press
Y) to compare the preset against the original. This tells you quickly whether the preset is right for the image or whether you need a different stock.03.
How to Apply a Preset in Lightroom CC
- Open an image in edit mode
- Click the Presets icon in the right panel (looks like a small slider icon)
- Browse by folder, hover to preview, click to apply
- To reduce the preset’s strength, click the preset name again after applying, a Preset Amount slider appears letting you blend the effect between 0 and 100%
The Preset Amount slider is one of the most useful features in Lightroom CC and is not available in Classic. If a preset is too strong for a particular image, blending it at 70 to 80% often produces a more natural result than manually correcting each individual slider.
04.
How to Apply a Preset in Lightroom Mobile
- Open a photo and tap Edit at the bottom
- Scroll the toolbar and tap Presets
- Browse the preset folders, tap to preview, tap again to apply
- Tap the preset name to access the Amount slider for blending
- Adjust exposure first after applying
For best results on mobile: shoot in RAW (most modern iPhones and Android flagships support RAW in Lightroom Mobile). The preset will have significantly more tonal range to work with than a JPEG.
05.
After Applying: The Three Adjustments That Matter Most
Most images need only three small corrections after the preset is applied.
1. Exposure
The preset may shift overall brightness by half a stop in either direction. Check the histogram, if it is clipping highlights (pushed hard against the right edge) pull exposure down slightly. If shadows are crushed (hard against the left edge), bring exposure up. A well-calibrated preset on a neutral exposure rarely needs more than plus or minus 0.3 EV of correction.
2. White balance
Film presets are tuned for specific color temperatures. Kodak presets run warm and perform well in golden hour light. In midday sun or shade, the warmth can push too far. Fuji presets run cooler and handle overcast and shade well but can look grey in warm tungsten light.
Quick fixes:
- Skin tones too orange: drop Temperature 100 to 200K
- Image looks grey or flat: push Temperature 100 to 200K warmer
- Greens look unnatural: adjust Hue and Luminance in the HSL panel for Green
3. Grain on high-resolution files
A grain setting built for a 20-megapixel sensor can look heavy on a 45-megapixel file. If the grain looks digital rather than analog, open the Detail panel and reduce Grain Amount by 20 to 30%. The texture should feel like part of the image, not something sitting on top of it.
06.
Batch Editing: Apply Presets Across a Full Shoot
This is where presets save the most time. Editing a full wedding gallery or travel shoot one image at a time negates the entire point of using presets.

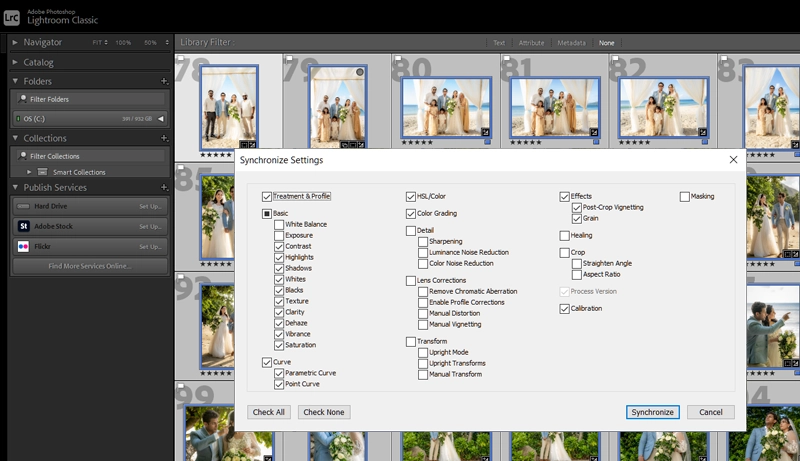
Select all images from a shoot, hit Sync Settings, and the preset applies across the entire gallery in seconds. The correct batch workflow in Lightroom Classic:
- Select your best-lit, most neutral image from the shoot as a reference
- Apply the preset to that image
- Make the exposure and white balance corrections for that image
- In the Library module, select all images from that shoot (Ctrl+A / Cmd+A)
- Click Sync Settings in the Develop module with your reference image selected
- In the Sync dialog, check: Process Version, White Balance, Tone Curve, Color, Detail, Grain, Color Grading, Camera Calibration
- Click Synchronize
All selected images now have the preset and base corrections applied. You then go through image by image making individual exposure tweaks, this takes 10 to 30 seconds per image rather than 5 minutes.
In Lightroom CC:
- Apply preset and base corrections to the reference image
- Tap the three-dot menu and select Copy Settings
- Select the other images
- Tap Paste Settings
07.
Adjusting a Preset After Applying
A preset is a starting point, not a finish line. Knowing which panels to adjust and which to leave alone is the skill that separates photographers who use presets well from those who spend more time correcting than the preset saved.
Safe to adjust after applying:
- Exposure, contrast, highlights, shadows, whites, blacks, standard tonal corrections
- White balance, nearly always needs slight tweaking per image
- Grain Amount in the Detail panel, adjust for your camera’s resolution
- Clarity and Texture, the preset value works as a baseline; adjust for the subject
Adjust with care:
- HSL Hue values, the preset’s hue shifts are calibrated to work together; changing one channel affects the overall look
- Tone Curve, changing the curve shape fundamentally alters the preset’s character; adjust the Exposure slider instead
Leave alone unless something is clearly wrong:
- Camera Calibration panel, this is where film presets do much of their color science work; moving these sliders changes the fundamental color response of the preset
- Color Grading shadow and highlight tints, the shadow-to-highlight color relationship defines the film stock charac
08.
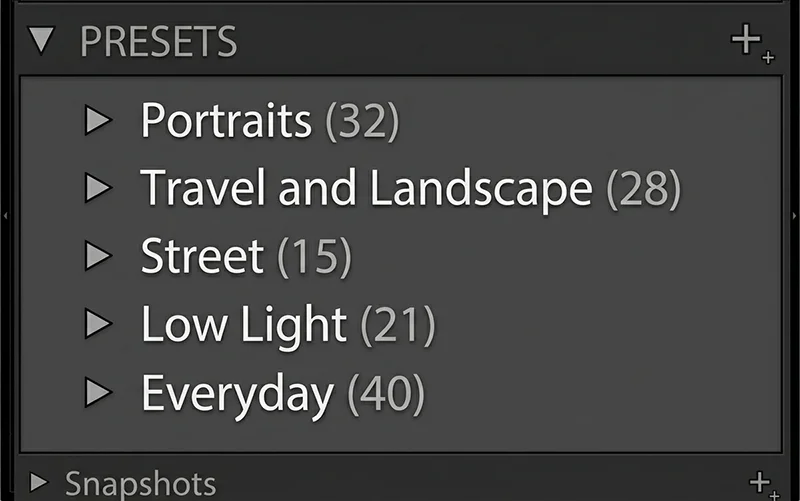
Organizing Your Presets for Speed
A well-organized preset library is as important as the presets themselves. If you spend 30 seconds searching for the right preset every time, a 200-image shoot costs you an hour before you start editing.

A preset library organized by subject and light finds the right look in seconds. More than 20 active presets starts slowing you down. A practical folder structure:
- Portraits: Portra 400, Pro 400H, Portra 160, any skin-tone-focused presets
- Travel and Landscape: Ektar 100, Velvia 100, Gold 200, high-saturation stocks
- Street and Documentary: TRI-X 400, T-MAX 400, Vista 400
- Low Light: Portra 800, Natura 1600, high-speed stocks
- Everyday: Superia 400, Color Plus 200, accessible consumer stocks
Keep your active presets to 15 to 20. If you have 200 presets installed and use 5 of them consistently, archive the rest. Speed comes from familiarity with a small set, not from having every option available.
09.
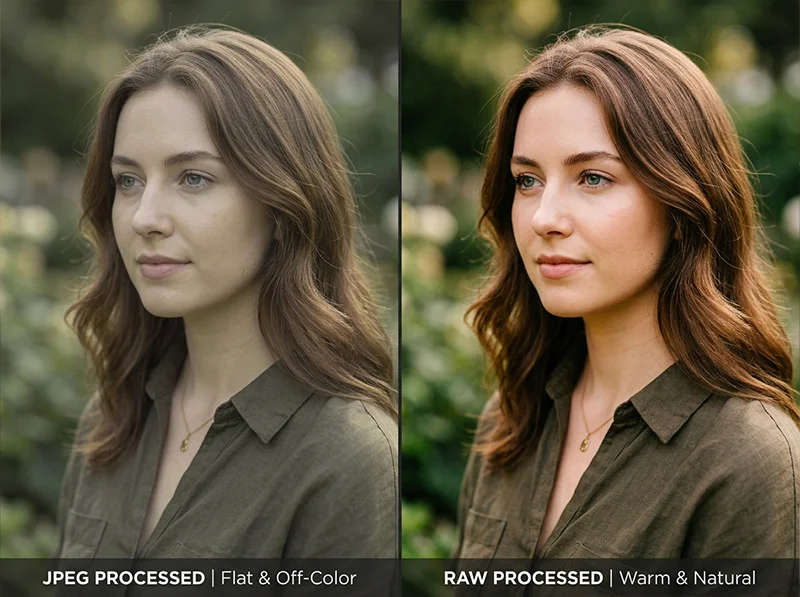
Common Mistakes and How to Fix Them

The same preset on a JPEG (left) and a RAW file (right). The RAW version gives the tone curve room to work. - The preset looks nothing like the preview thumbnail: Almost always caused by applying to a JPEG or a heavily pre-corrected file. The preset’s tone curve assumes neutral input. Apply to a neutral RAW export and compare.
- Skin tones look orange or yellow: The preset is running warm for your specific light. Drop Temperature 100 to 200K. If the problem persists, check the HSL panel, reduce Orange
- Saturation by 5 to 10 points: The grain looks digital and noisy, not analog: Either the Grain Amount is too high for your camera’s resolution, or you are viewing the image at 100% zoom where grain is always more visible than in a final print or screen export. Check at 25% or 50% zoom first.
- The preset looks good on portraits but flat on landscapes: You are using a portrait-optimized preset on the wrong subject type. Portra is built for skin tones, not saturated landscapes. Switch to Ektar 100 or Velvia 100 for landscapes. The reverse is also true, Velvia on a portrait will fight skin tones.
- Batch sync made every image too bright or too dark: The reference image you synced from had a non-standard exposure. Sync the preset settings only (not the exposure values) and then correct each image individually. In the Sync dialog, uncheck Exposure and Tone before synchronizing.
10.
Quick Reference: Preset Workflow by Platform
Step Lightroom Classic Lightroom CC Lightroom Mobile Apply preset Presets panel, left sidebar Presets icon, right panel Edit, Presets toolbar Preview before applying Hover over preset name Hover over preset name Tap to preview Reduce preset strength Not available Preset Amount slider Preset Amount slider Batch apply Sync Settings Copy and Paste Settings Copy and Paste Settings Adjust after applying Full panel access Full panel access Core panels only 11.
FAQ
Should I apply a preset before or after editing?
Always apply the preset first to a neutral, uncorrected RAW file. Then correct exposure and white balance. Applying a preset to a heavily pre-adjusted image produces unpredictable results because the preset’s tone curve is calibrated for a neutral starting point.
Can I use multiple presets on one photo?
Not directly, applying a second preset replaces the first. The exception is using a preset for one specific panel (like a grain-only preset) which only updates those panels. For combining looks, apply the first preset, then manually adjust the elements you want from the second.
How do I reduce a preset’s intensity in Lightroom Classic?
Classic does not have a Preset Amount slider like CC and Mobile. To reduce intensity, apply the preset, then manually move the key sliders (Tone Curve, Grain Amount, Color Grading tints) back toward neutral to taste.
Why does my preset look different on different photos from the same shoot?
Variation in exposure between shots is the most common cause. A preset calibrated for 0 EV will look different on a shot that is 1.5 stops underexposed. The solution is to correct each image’s exposure after applying the preset, not before.
Can I save my own adjustments as a new preset?
Yes. After applying a preset and making your corrections, go to the Presets panel, click the plus icon, and choose Create Preset. Select which panels to include and save. Your custom version is now available for every future image.
Do presets work on video in Lightroom?
Lightroom Mobile supports basic color adjustments on video clips. Lightroom Classic does not apply Develop presets to video, use Premiere Pro or DaVinci Resolve for video color work.
Related Articles
- What Are Lightroom Presets? A Complete Beginner’s Guide
- How to Install Lightroom Presets on Desktop, Mobile and Photoshop
- The Best Lightroom Presets for Photographers in 2026
- Lightroom Mobile Presets: The Complete Guide
- Free Lightroom Presets: An Honest Guide to What’s Worth Downloading
Richard is a commercial and editorial photographer with over 15 years behind the lens. He’s shot on film and digital across three continents, and still keeps a Nikon F3 loaded with Kodak Portra on his desk. At LegendaryPresets, he leads preset development – studying actual film scans to make sure every stock behaves like the real thing.